
DIY Video Studio is supported by its readers who use the affiliate links or ads on this site. As an Amazon Associate, I earn from qualifying purchases. Thank your support if you use any of the links.
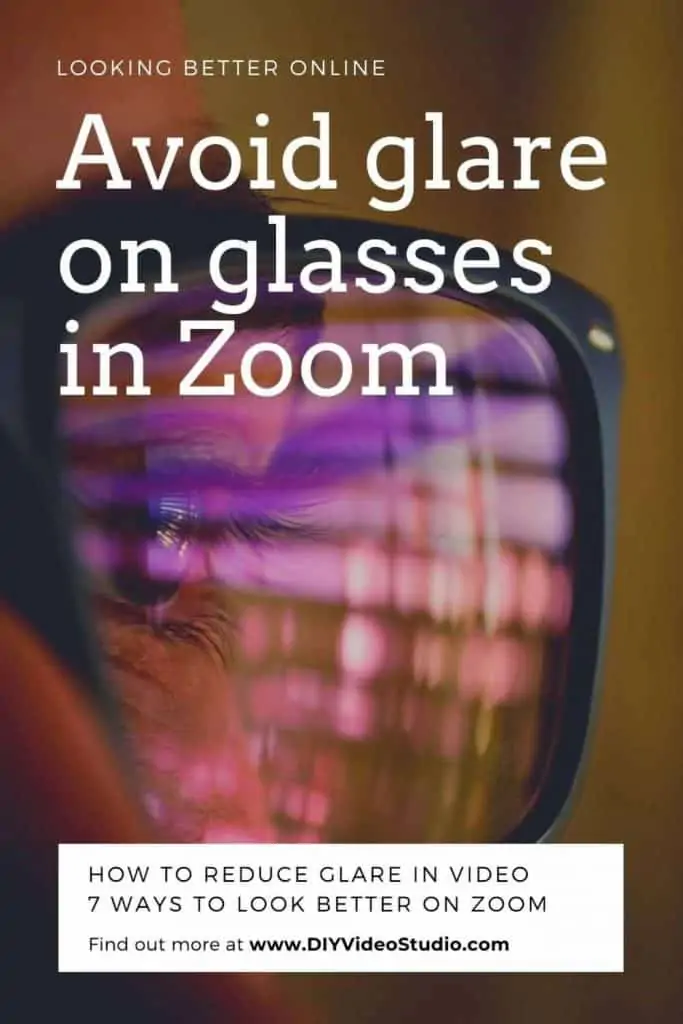
If you’re like me and need reading glasses, then that can be a problem if you’re on a Zoom call or recording video. You’ll need your glasses to read your notes, use your computer, or even read from a teleprompter. But light reflections can cause annoying glare on your glasses. So how do you avoid glare on glasses in video and Zoom calls?
How to avoid glare on glasses in Zoom video calls:
- Move your light so it’s above head height and to the side.
- Once you’ve moved your light don’t look towards it.
- Increase the level of ambient room light.
- Use a large soft light to make reflections less noticeable.
- Turn your wall into a broad light source.
- Use window light at an angle.
- Tilt your glasses.
Although that’s basically what you need to know, do keep reading because I’ll go into the detail of each of those points. Not only will you understand why each method works but also how to apply it.
How to reduce glare in video calls by moving your light
If we’re looking at how to reduce glare on glasses in zoom or video we need to look at the physics. I’m sorry. But I’ll try and keep this as brief as possible.
You need to know that light will reflect off your glasses at the same angle as it hit the lens. So, if your light is next to your webcam and you’re looking at the webcam the light will hit the lenses of your glasses at 90-degrees, so will be reflected straight back. Since your webcam and light are next to each other the light is effectively reflected off your glasses and straight to the webcam or camera. That produces glare on your glasses.
But if you move the light far enough away from the webcam or camera, the angle between the light, your glasses, and the webcam becomes large. Consequently, the angle of reflection, which is equal in size, also becomes large and the reflection of the light falls beyond your webcam’s field of view. The result is that there’s no glare from the light on your glasses.
So, moving your light and webcam apart is the way to go. But here’s what to do in practice on how to avoid glare on your glasses in webcam videos.
You can basically move your light in two directions: the height can be changed and its position off to the side of the webcam can be altered. We’ll first look at changing the height to avoid Zoom glasses reflection.
Change the height of your light
Let’s assume a simple lighting setup for your Zoom video call. A desk lamp or a video light is placed next to your webcam, which is itself at about eye-level. This is the setup in the left-hand image below.
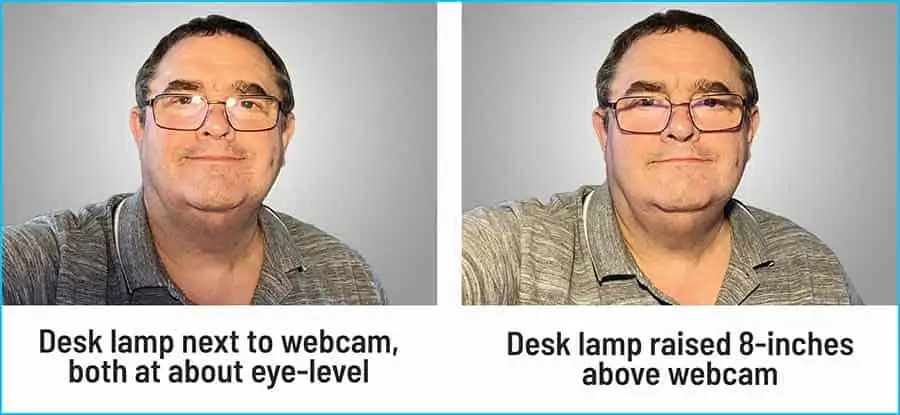
Since the light and webcam are both approximately straight in front of the glasses it’s no surprise the reflection of the lamp can be seen as glare on the glasses.
As already mentioned, we can raise the lamp to reduce the glare in the webcam video. In the right-hand image above, I’ve raised the desk lamp so it’s about 8-inches above the webcam. That small vertical distance is enough to make the angle between the lamp, glasses, and webcam large enough so that lamp’s reflection goes below the webcam’s field of view.
The result of that small vertical movement is enough to remove the glare on the glasses.
Change the horizontal position of your light
We know that raising the light will help get rid of the light glare in the eyeglasses, but also moving the lamp to the side will improve the lighting across your face.
Look again at the shots where I have the lamp in front of me. Because the light falls straight onto my face it makes my features appear quite flat. The only main shadow is under the rim of my chin, which seems quite dramatic compared to the flatness elsewhere.
By moving the light to the side, but still pointing at me, plus raising it a little we can remove the glare on eyeglasses while adding definition to the facial features. In the left image below, you can see how we have lost the glare but there’s too much definition. The shadow across the left side of the face is too deep, but that’s easy to fix.
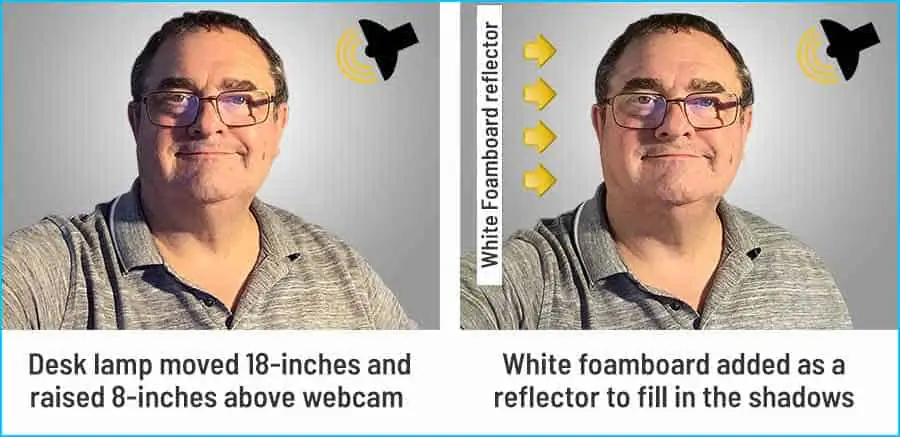
To fill in some of that shadow, but not all, we can a second light on the other side. Because we only want to remove some of the shadows, the light should be less bright than the original light.
If you don’t have a second light don’t worry, you can reflect some of the light from the lamp by using a white foam board. You don’t have to use foam board; you can stick some sheets of white printer paper to the side of a cardboard box. Plus, it doesn’t need to look fancy because it’ll be just out of shot.
Don’t look at the light

You’re not a moth, so don’t be drawn toward the light!
If you’ve taken the trouble of adjusting your lighting to avoid glare on your glasses in a video conference call don’t ruin the effect by looking toward the light.
If you look in the direction of the light, you’ll create the perfect angle between the light, your glasses, and the webcam for the light to reflect straight to the webcam. The resulting effect, the glare on your glasses will reappear.
I don’t mean that you should sit with a locked stare towards the webcam, just resist the urge to look everywhere other than at the webcam’s lens.
Turn up your office lights
If you get the opportunity to see behind the scenes of a TV news studio, they generally don’t use one, two, or three lights in their lighting setup. Often there are several lights that effectively illuminate the complete set.
Basically, this means you don’t need to have a bright light directly in front of you. With that being the case there’s not going to be any glare to reflect off your eyeglasses into the webcam.
Although your work office may not have professional video lighting, it should have enough lights to be reasonably bright. Most office spaces have white walls since this helps to make offices brighter because the walls will act as natural diffusers and reflectors. So, switch on all the lights and maximize the ambient lighting.
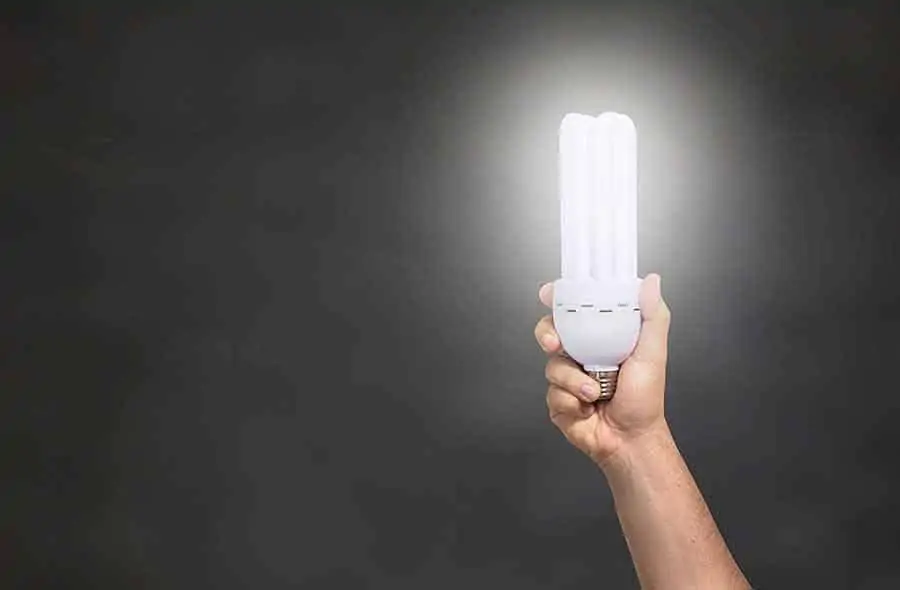
A home office isn’t governed by the same rules as those for workspaces, so it may be a little darker. However, you can still increase your ambient light levels. Consider switching your light bulbs for LED bulbs.
LOHAS LED 23W light bulbs are equivalent to 150W-200W incandescent bulbs and produce 2550 Lumen of super bright daylight white light. You can also bounce the light from one or two desk lamps off your walls or ceiling to raise the ambient light level.
Over the last year, I’ve been replacing my professional CFL bulbs in my video softbox light kits with LOHAS LED bulbs. The bulbs are bright, cheap when compared to video CFL bulbs, and have a long lifespan. The outer bulb parts are made of durable plastic and have survived being dropped on a hard floor.
| # | Preview | Product | Price | |
|---|---|---|---|---|
| 1 |
|
LOHAS A21 Bright LED Light Bulb, 150W-200W Equivalent LED Bulbs, 23 Watt... |
$28.99 |
Buy on Amazon |
Last update on 2023-09-21 / Affiliate links / Images from Amazon Product Advertising API
Use a large soft light to make reflections less noticeable
What exactly is a softlight?
A softlight, like a softbox, umbrella light, or umbrella softbox is a light bulb or bulbs with a large light modifier in front. The light modifier is usually a white nylon fine mesh or diffuser but could be a translucent white plastic material.
The purpose of the light modifier is to turn a small source of light (the bulb) into a large source of light. This produces a quality of light known as soft-light. With this light source close to you the illumination comes from every point on the light modifier, or seemingly from many directions. So only shadows caused by light from one point on the modifier will be filled in by light from all the other points on the light modifier, blurring those shadows.
Meanwhile, a single bare bulb effectively produces light from one point called hard-light. It will cast hard shadows with well-defined edges that are very noticeable.
If you must place your light behind the webcam and have some extra space, consider getting a soft light. These could be a traditional softbox, shoot through umbrella light, or an umbrella softbox.
Even if you can’t raise up the soft light it will still reflect off your glasses. However, because the front of the soft light is large the glare on your glasses will appear to be reduced. A large soft light will be less noticeable on your glasses than a simple bare bulb.
As we’ve already seen, raising the light and moving it to the side will avoid the reflection of the light back into the webcam’s lens. But there’s an advantage in using a soft light instead of a desk lamp.
Because a large soft light is less noticeable as glare on your glasses you’ll have more freedom in where you can look. If occasionally you glance toward the light it really won’t matter because there will be a lot less of that bright reflection.
The other benefit of using a soft light is that they have a flattering effect. The soft light tends to wrap around your features, smoothing out shadows. That’s great news if you have a wrinkle or two because that smoothing of shadows will help to make any lines and wrinkles less noticeable.
But that softening effect has a more direct effect on the shadows created by the lighting setup. Look at the following image that we’ve seen before.
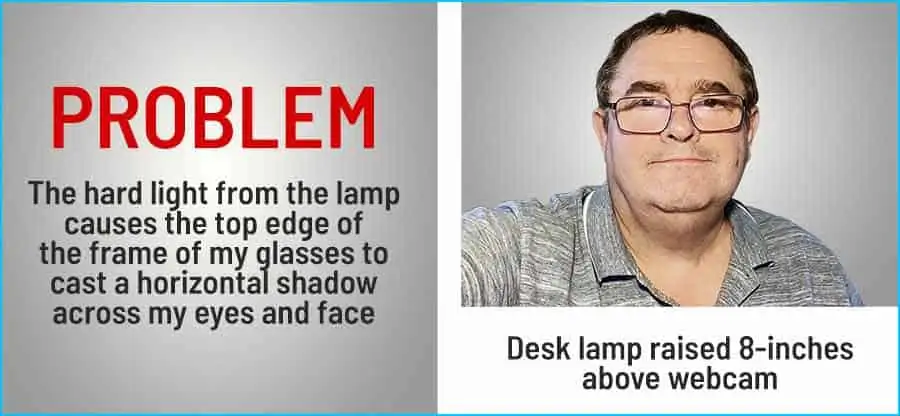
It was shot with the desk lamp in front of me but raised up to eliminate the glare. Unfortunately, because of the hard quality of the light, the top edge of the glasses frame casts a shadow across my eyes.
But if we replace the desk lamp with a softbox, which is a light that produces soft light, we can make those shadows across my eyes disappear. In fact, the overall look is much better with the softbox because of the way soft light “wraps around” the subject. However, notice that refraction of the light through the lenses forms a kind of shadow just below the lower edge of the frames on my cheeks. We’ll solve this by moving the softbox and using the foam board reflector.
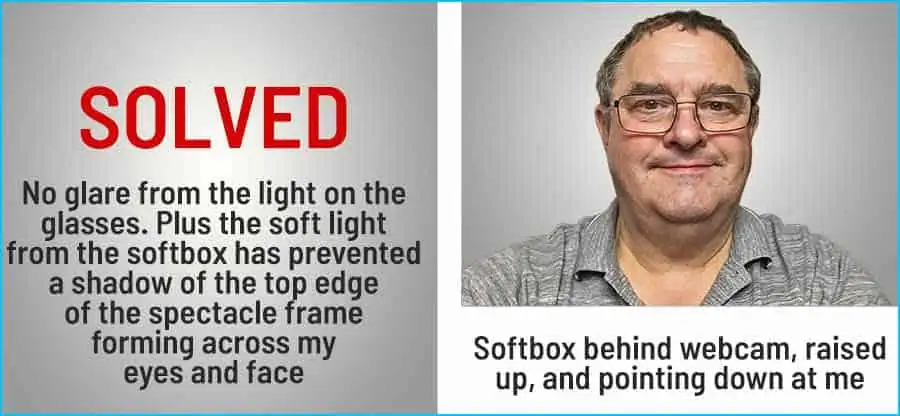
In the next image, the softbox has been moved off to the side and is also raised a little, just as we did with the desklamp. As before, we fill the shadow on the opposite side of my face by bouncing light back into the shadows with a simple white foam board reflector.

Notice we have managed to get rid of several things by carefully positioning the softbox light off to the side and a little above my head:
- No more glare on the glasses
- Shadows cast by the glasses frame and temples (legs) have gone
- The odd shadow below the bottom edge of the lenses is reduced
Whether you position the softbox in front of you, or off to the side and use a reflector to bounce light back into the shadows, the effect will be much more attractive and professional than using a simple desk lamp.
Although using desk lamps to avoid glare on glasses in video conferencing they can introduce other problems, like those shadows cast by your frames.
If you’re going to participate in a lot of Zoom calls it makes a lot of sense to get a video softbox light kit. It’s cost-effective and will improve the way you look on video.
When shopping online make sure you look for continuous lighting kits. As the name suggests, they produce continuous light, unlike the flash of strobes or speedlights, which would be used for photography.
Whichever softbox you choose, it may come with spiral CFL bulbs. These are perfectly OK to use but it makes sense to replace them with LEDs when you come to renew them.
Unless you are leaning towards wanting to get professional lights, I’d recommend the LOHAS LED 23W light bulbs mentioned earlier on. They are bright, producing 2550 Lumens of bright daylight white light and they are inexpensive compared to professional video lights. Plus, they can also be used around your home if you like the bright daylight look.


Last update on 2023-09-21 / Affiliate links / Images from Amazon Product Advertising API
Turn your wall into a large soft light source
If you have a wall behind your desk that’s great. If it’s a white wall, then that’s even better. You can point one or two lights at your wall and turn it into a superb soft light source.
Remember, any large light source will effectively be a source of soft light. That includes white walls and ceilings. So, if you point some bright lamps towards the wall in front of your desk, you’ll have lots of soft light illuminating your face.
Because the wall is a wide and tall soft light, any reflection on your glasses will be much less noticeable than having a bright light directly in front of you. But you’ll also get the added benefits of a soft light. Shadows will be softened or eliminated, and the light has a flattering effect on your facial features.
But what if the wall in front of you isn’t white?
That’s no problem. Prop up a couple of sheets of 20”x30” foam board against the wall. It’s relatively cheap and sturdy.
If you have been decorating your home using wallpaper you could tape some of the wallpaper to your wall. It doesn’t matter what the pattern is on your wallpaper, just reverse it and use the plain white rear side.
Use window light at an angle
If you have set up your computer or laptop so that you’re facing a window this can be a problem for Zoom calls or video conferencing if you wear eyeglasses. Although the broad window light will produce beautiful soft light it will also produce glare on your glasses.
The solution to getting rid of the glare is quite simple. Turn (you and your webcam) away from the window until the reflection in your glasses disappears. The amount you’ll have to turn may depend on how big your window is and how curved your spectacle lenses are.
Before moving your laptop and webcam do a test with your smartphone. Hold your phone at arm’s length with your camera app on, as if you were taking a selfie video. Then turn on the spot away from the window until the window reflections in your glasses disappear. That will give you an indication of where you will need to set up your laptop or webcam. In my experiment, I had to turn almost a full 90-degrees away from my lounge window before losing the glare in my glasses. You can see the before and after in the two images below.
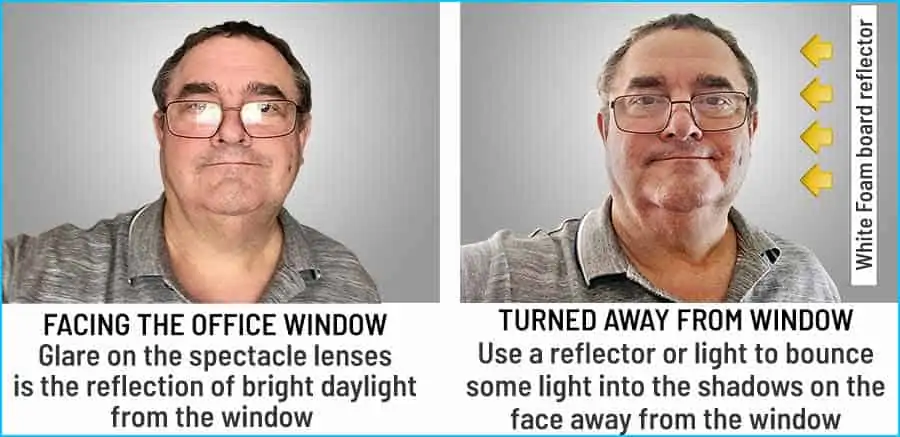
However, you may need to place a reflector, such as our white foam board, on the opposite side of your face. You need this to bounce some window light into the shadows on the side of your face furthest from the window. Of course, you don’t have to use a reflector, you could use a desk lamp or softbox.
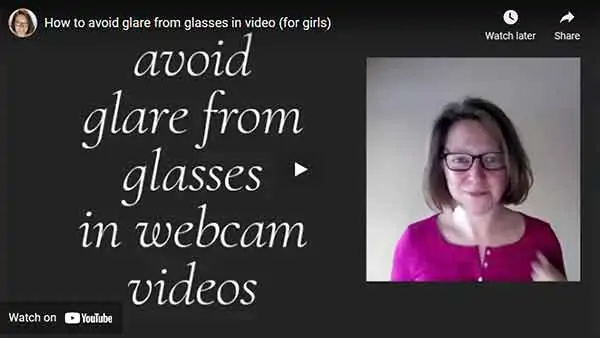
Tilt your glasses to stop reflecting your computer screen
This is a neat trick from Christina O’s YouTube video, “How to avoid glare from glasses in video (for girls)”. Although it does help in avoiding reflecting the glare of your computer screen, it can make the seating of your glasses look a little unnatural. It’s not the perfect solution, but even so, it does work.
As you’ll note from the title, the tip is specifically for women since it involves the use of bobby Pins (known as kirby grips or hair grips in the UK). However, it can be adapted for men, especially if you have curly hair or your glasses grip the sides of your head tightly.
Christina’s hack stops a bright computer screen reflecting to your webcam or smartphone when on a Zoom, Skype, or another type of video conference call.
You could try lowering the brightness of your computer screen but that brings its own problems. First, you can’t properly see other participants on the call. Second, you can’t see the menu or controls on the video conference app you’re using. Third, if you want to share your screen to show a presentation, you’re going to have to turn the screen brightness up again to see your slides, etc.
The basic idea is to raise the temples or legs of your glasses up so that the lenses tip downwards. Because the lenses and computer screen are no longer parallel or square on, the reflection of the will be angled down towards your desk or tabletop rather than your webcam.
Christina does this by twisting a small amount of hair together from just above the ear. Pull the twist of hair straight back and use the bobby pin to secure it in place. Now let the rest of your hair back down into place near your ear. Repeat on the other side of your head. For the step-by-step process watch the video below.
You can now put on your glasses but poke the temple tips through the slots formed by the twisted hair strand. Your glasses and lenses will be tipping forwards so the reflection of the screen should either disappear or be minimized.
Obviously, this technique might not work as well with men, although if you have lots of curly hair near your ears the hack will work with the need for bobby pins.
In my case, because my glasses form a snug fit against the side of my head, I can just raise the temples and my glasses will stay in place. Don’t try bending your glasses to give a tight fit, this could cause damage.
This hack also works if you’re using a desk lamp or ring light positioned either behind and slightly above your computer screen or on the desk in front of you. The fact that the lamp is slightly higher than your webcam or camera is to your advantage. The higher position of the lamp means a larger angle between the lamp, your glasses, and your webcam. So, you will need to tilt down your glasses slightly less than in the case of eliminating the computer monitor reflection.
You may also like…
- How can I improve my Zoom audio settings quality
- Softbox vs umbrella lighting for video: Best one to buy
- How do I disable video camera on Zoom meeting
- Why is my zoom video grainy and how to avoid it
- Best Microphone for better Zoom call: Buyers Guide
- Best ring light for audition self-tapes
- How to make webcam video look better
- The Best Green Screen for Home Office Video Conferencing
- Best Ring Light for Zoom Calls, Meetings, and Video Conferencing
- How to use a webcam to record video on Windows 10
SUMMARY
Summarizing the details above, this is how to avoid glare on glasses in video zoom calls:
If your desk light must be in front of you, raise it up 6 to 12-inches. However, you may introduce shadows from your frames and the lighting may appear a little flat.
A better option is to raise the light and move it to one side, but you will need to add a reflector or another light on the other side to fill in any shadows.
Instead of using desk lamps try introducing light modifiers just in front of the light. The easiest way to do this is to buy a softbox or similar light producing soft light.
When you have moved your lights, so that the glare isn’t reflected off your glasses, don’t move your head significantly and look in the direction of your light. Doing so will create the perfect angle to reflect the glare to your webcam.
You could of course get rid of those extra lights and just increase the ambient lighting in your room or office. That works especially well if you have white walls and ceiling because they act as free light reflectors.
If your workstation is up against a wall and there’s no room for a light, point a couple of lights at the wall in front of you and the whole wall will become a soft light source.
Finally, window light can be good for any kind of video. The trouble is that facing the window will reflect in the lenses of your glasses. To get around this problem, turn away from the window by about 90-degrees and fill any shadows by bouncing window light with a simple reflector, such as a sheet of foam board.
Tosh Lubek runs an audio and video production business in the UK and has been using the Canon EOS R since it was released in the Autumn of 2018. He has used the camera to shoot TV commercials for Sky TV, promotional business videos, videos of events and functions, and YouTube creator content. He has also won international awards for his advertising and promotional work. You can meet him by visiting his “video booth” at HashTag business events across the country.
Recent Posts
Most people use sandbags the wrong way. Here’s how to hang them properly on a light stand for maximum stability and safety — plus what to fill them with.
You're Using the Canon RF 50mm f/1.8 WRONG! Here’s How to Fix It
If you’ve recently picked up the Canon RF 50mm f/1.8 STM—affectionately known as the Nifty Fifty—you might be confused by that strange switch on the side of the lens. It doesn’t say AF/MF...
