

DIY Video Studio is supported by its readers. Please assume links on this site are affiliate links, and that I get commissions for purchases made through these links. As an Amazon Associate I earn from qualifying purchases. It helps me pay for the running of this website. Thank you if you use any of the links, I really appreciate it!
I looked dreadful on remote Zoom meetings until I realized what was causing my video to be so grainy. So what was the problem?
Poor lighting and video noise from small image sensors are the main reasons why Zoom video seems grainy. Under poor lighting, the camera will boost the signal from each pixel on the sensor to try and brighten the image. However, this also boosts the video noise, which appears as grain in the image.
Obviously, you can’t make those tiny pixels produce less video noise but you can make your Zoom video, in fact, any video, look much less grainy. Here’s how to avoid grainy video.

Use good lighting for better Zoom video quality
Without doing anything else, good lighting will make the biggest difference in improving your Zoom video quality from your existing camera. That’s true, whether you’re using a webcam, smartphone, or DSLR.
IN A HURRY? In the table below, we’ve researched four products that can help you avoid grainy video on your Zoom meetings and calls.
Last update on 2025-10-11 / Affiliate links / Images from Amazon Product Advertising API
Use natural window light
Daylight produces beautiful lighting for video and photos, that’s why the majority of wedding photos are taken outside. So it shouldn’t be surprising that daylight can also improve your Zoom meeting video.
Use the daylight that’s pouring in through your window. For best results, you want a large window since it will let in plenty of daylight. If you have curtains or blinds, open them. The aim is to use your office window as a huge light, or window light. Effectively, it’ll be a little like a photographer’s softbox that produces soft and flattering light.
The window light will illuminate both you and your office, but the amount of light does drop off as you move back away from the window. So, to avoid grainy Zoom video make sure you are close to the window, where the illumination will be brightest.
To demonstrate the difference between the illuminance close to a window and a litter further away I took a couple of images of myself on my iPhone. I also measured the illuminance using the LUX app. You can see the results below.
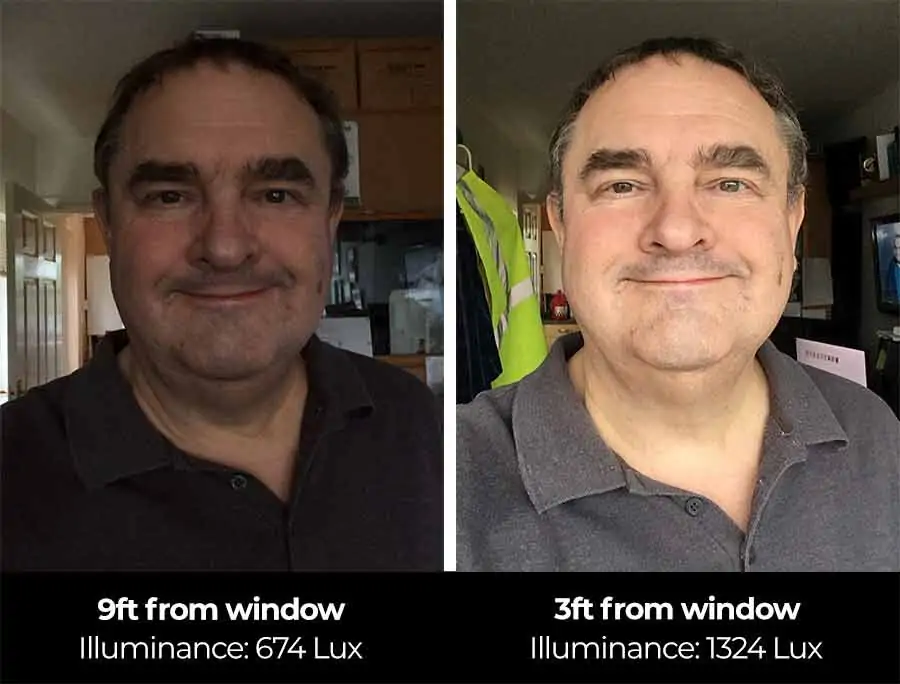
At 3ft from the window I set and locked the exposure before taking a picture and measured the illuminance as 1,323Lux. Moving 6ft back to 9ft from the window I took another photo and measured the illuminance as 674 Lux. Clearly moving just 6ft further away made a significant in the illumination.
Normally you wouldn’t notice this difference in illumination on your webcam or smartphone because the camera automatically adjusts the exposure. But in doing so the video noise, or graininess, will also be boosted, which is what we want to avoid.
So, if you don’t have a video light, the first step in avoiding grainy Zoom video could be to move closer to your window.
Use a video light for video conferencing
If your office doesn’t have a large window or if your desk is against a side wall and not at the window then you might need to use an LED video light. I would recommend using a small LED panel light or a ring light for Zoom meetings. If you have a little more space and wear glasses a better option may be a pair of LED lights with softboxes. You’ll be able to place them a little off to each side of your camera so that the reflections aren’t visible in your video. You can read more in these articles.
- Best LED lighting for video conferencing
- Best Ring Light for Zoom Calls, Meetings, and Video Conferencing
- Neewer Bi-Color 660 LED Video Light With Softbox Review
Add some light to your room background or backdrop
If you take a closer look at the photo of me at 3ft from my office window you may notice not all the graininess has disappeared.
Look at the office background and you should notice something. Anything that is light or light-colored isn’t grainy but the mid-tones, such as the ceiling, and the shadows show significant grain. You should notice the difference if you compare the darker areas with the white of the PC monitor to the right, and the yellow hi-viz vest to the left, plus the white boiler on the back wall (which is next to a window). All these are relatively free of video noise or grain.
So now that you know how to make yourself look much better how do you do the same for your background?
The first thing to consider is to switch on the room light. This should make a difference but if there are areas that you want to improve further set up a few discrete table lamps or desk lights.
If you need more light to spill over a wider area and fill those shadows you could get a video umbrella light. Shoot-through umbrella lights are far less directional than softboxes or LED panels and have a tendency to also spill light off to the sides.
If you want a creatively stylish look to your office background you could add some small RGB LED panel lights. Place them pointing upwards on desks and shelves to add some color highlights to the walls.
Lighten up your background and clothes
If your office background has some dark objects and video noise is appearing in those areas consider whether you can lighten them. Perhaps all it will take is adding some extra light, as mentioned above. If the dark object is a couch or other piece of furniture could you cover it with something that’s much lighter? But if those dark or black objects are laptop cases, boxes, etc. you could just move them so they’re out of sight.
If what’s in your office background is a problem and you can’t make it look lighter you could set up a white backdrop just behind you.

You could use an ironed sheet or get a collapsible white backdrop like this 5’x7’ white backdrop from Neewer![]() , although you may also need a support stand.
, although you may also need a support stand.
Finally, consider what you’re wearing. Black or dark colors reflect less light, so they might be a problem for you. White or light shades will appear better on webcams and smartphone cameras.
Pick your colors carefully
A color video image is made up of three colors: red, green, and blue. By mixing the amount of each of those three colors you can produce the colors in the rainbow.
However, image sensors are not good at seeing those three colors equally well. Red and green are easy to “see” for video cameras, which is one of the reasons why green is chosen for chromakey background replacement. Blue, however, is more tricky. The camera has to amplify the blue channel and that can mean more video noise in the blue channel of a video signal.
So what does this mean in the real world?
Anything that is blue or has a lot of blue in its color will be more susceptible to video noise or grain in the video, especially under poor lighting. So try to avoid wearing dark blue colors or having a lot in your background that’s dark blue.
Can you make your Zoom conference call outside?
I’ve already suggested using window light. When it comes to lighting, you’ll not find a brighter light than the sun. So why not consider taking your Zoom call outside. Even on an overcast day, there will be plenty of light to avoid grainy video. Plus, if you’re in your backyard or in a public park the background will probably be quite attractive. The following screengrab is from a video I recorded in my backyard for my local church. In September the garden is still looking fine but will take on a different look by the end of October.

There are of course disadvantages to making your call from your backyard or somewhere outside. If it’s a business call your backyard might seem a bit too informal. Depending on your geography and weather your backyard may not be an option. Also, you may find that the background sounds are too distracting. Perhaps the sound of songbirds, passing traffic, or passenger jets might not be the best soundtrack to your call.
Perhaps the sound of songbirds, barking dogs, passing traffic, or passenger jets overhead might not be the best soundtrack to your call. However, there are ways to cut down background noise. Instead of using an omnidirectional lavalier microphone, you could use a unidirectional mic like the Deity V-Mic D3![]() and have it pointing up towards your mouth. That way most of the sounds from around you will be rejected by the microphone, but your voice would be heard clearly.
and have it pointing up towards your mouth. That way most of the sounds from around you will be rejected by the microphone, but your voice would be heard clearly.
Another outside location you could choose for your Zoom meeting, especially if your work takes you on the road, is your motor car. Obviously, you can’t do it while driving. Make sure you’re parked somewhere quiet, have the sun in front rather than behind, and fix your smartphone somewhere like your windshield.
Test and adjust
Once you’ve adjusted your setup and perhaps changed into lighter colors you should do a test. You can see how you look by going into your Zoom settings and then the video section. You’ll see a preview where you can judge whether you have done enough to avoid grainy video. If you don’t see any obvious graininess, you should be good to go. But if the grain is still there, you’ll need to tweak your setup further and test again.
After making the improvements to your lighting you still have grainy Zoom video the problem may lie with the quality of your webcam.
Improve your camera settings to eliminate grain
Webcams, whether built into your laptop or a standalone model, aren’t the only way to do video conferencing. You can also connect your smartphone, DSLR, and even a GoPro to your computer.
Once you’ve set up your camera gear you can move on to the settings you need to let in more light to produce a brighter image without boosting the grain.
Photographers frequently talk about the Exposure Triangle. Think of an equal-sided triangle (equilateral triangle). The corners of the triangle represent Aperture, ISO, and Shutter Speed. Taken together these three elements determine the exposure.
Increase the Aperture
The aperture of a camera’s lens is the opening through which light passes before it strikes the image sensor. It’s not measured in millimeters or fractions of an inch but in f/stops, where the difference between each f/stop represents twice (or half) the amount of light. However, high-value f/stops represent a smaller aperture and smaller f/stops represent larger apertures. So, for a brighter image, you want a larger aperture, which translates to selecting a lower f/stop.
Older lenses have the f/stop numbers printed or engraved on the lens barrel, while modern digital lenses show the f/stop number on the camera’s screen or viewfinder. Typically, they might go 1.4, 2, 2.8, 4, 5.6, 8, 11, 16, and 22.
Unfortunately, not all cameras have a physical aperture, such as smartphones and webcams. But if you are using a DSLR or Mirrorless camera as a webcam, you can adjust your aperture.
Since our aim is to reduce grain, we want to increase the overall brightness of the image. To do this we need to open up the aperture. From above you will know that we must reduce the f/stop number to the lowest number on the lens. That will give you the maximum amount of light through into the camera.
Lower the Shutter Speed
The shutter speed affects the amount of light that is picked up from the image sensor. However, the longer the shutter speed the more motion blur there will be in the image.
With a still camera, a photographer would adjust the shutter speed as required. When taking shots of fast-moving objects, like backyard birds or NASCAR racing, photographers will drop the shutter speed to hundredths or even thousandths of a second. Although that is possible when shooting video, the results will look very unnatural.
The normal advice for video is that you always shoot at the same shutter speed, and that’s twice your framerate. The TV system in North America is approximately 30fps and that’s the same for most webcams. So your shutter speed should be set to 1 over 2×30, or 1/60th of a sec. However, if you don’t care about a little motion blur increase the shutter speed from 1/60th to 1/30th of a second. This will allow in twice the amount of light and therefore make the image brighter without increasing the grain.
Reduce your Frame Rate
I mentioned frame rates in the previous section and that the normal frame rate in North America (also on most webcams) is about 30fps. However, some cameras can record at faster frame rates. Some webcams, especially those intended for use by game channels, can run at 60fps. Some DSLR and Mirrorless cameras can also run at 60fps or even higher.
Shooting your video at these higher frame rates produces smoother-looking video. But since you’re shooting twice the number of frames per second you also run the risk of cutting the amount of light by half.
If you can’t improve your lighting and your camera allows changing the frame rate, try setting it to 30fps. If you don’t mind the video looking a little choppy you could lower the frame rate even further.
By using a slower frame rate, you are potentially letting in more light into the camera and therefore making the image brighter without boosting the video noise.
Lower the ISO
You can think of ISO as artificial brightness. On a video camera or camcorder, you’ll often see it referred to as the Gain and is measured in dB.
As you increase the ISO you are boosting the signal from the image sensor. As we discussed before, when you boost the signal from the image sensor you do make the image brighter but you’re also boosting any video noise, which appears as grain in your Zoom video.
Because increasing the ISO is also likely to increase the grain in your video only increase the ISO after you’ve tried other ways of making your image brighter.
Why do image sensors produce noise?
An image sensor is made up of millions of pixels that correspond to the pixels you see in the final image. You can think of each of those pixels on the sensor as a light-collecting bucket. After each exposure, the amount of light in the bucket is measured and the amount of light equals the brightness of that pixel in the image.
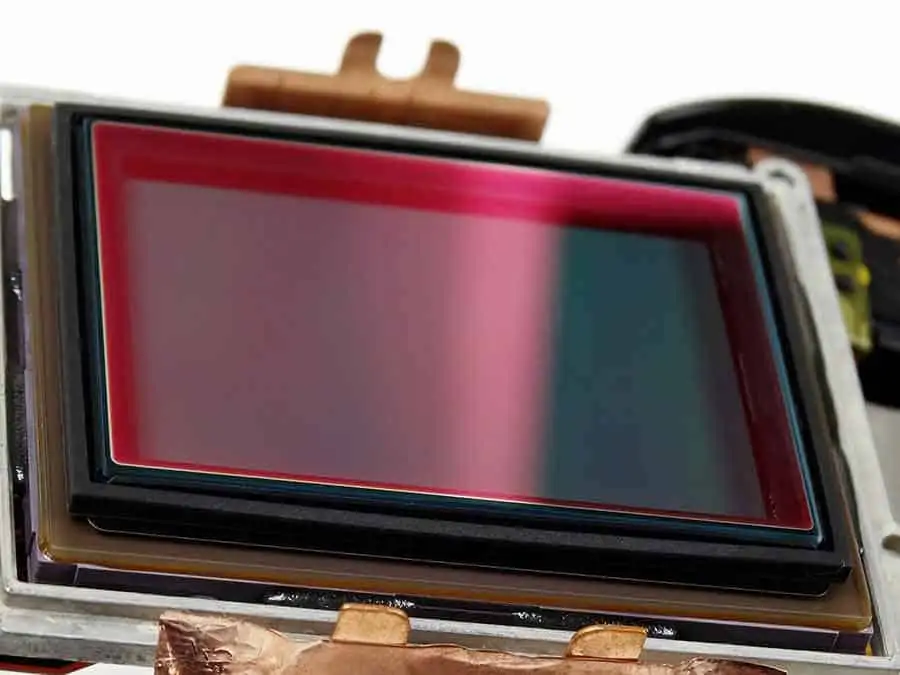
Unfortunately, the light bucket can also collect a signal that has nothing to do with the light being let in by the lens. It’s this extra signal that appears in the final image as noise or grain, it’s the image noise![]() .
.
Very roughly, if you change the size of the pixels on the sensor, i.e. the open area of the light collecting bucket, the amount of noise stays roughly the same but the ability of the pixel to collect light can change. All things being equal, it’s the size of the light-collecting area per pixel on the sensor that is the main reason that determines how much noise is apparent in the video image. The smaller the pixel the more noise relative to the light signal.
So larger sensors, which can have larger pixel areas to collect light (those light buckets), will produce cleaner images than very small image sensors.
A full-frame mirrorless camera, like a Canon EOS R, has an image sensor of 864 sq millimeters. At the other end of the scale, a typical webcam or smartphone has an image sensor with an area of about 20 sq millimeters.
As a result of the full-frame camera having a much larger sensor area, it’s possible to increase the brightness (the ISO) much more before the image noise becomes significant. The webcam, on the other hand, will produce a noisy or grainy image unless the lighting is good because boosting the brightness in the webcam will very quickly reveal the noise.
Summary
Cheap webcams and smartphones can produce video that appear noisy or grainy. The main culprit is the small size of the image sensor because the individual pixels have to be much smaller and so have a smaller light-collecting area.
The way to avoid grainy video on Zoom calls is to give the image sensor more light and reduce the dark and shadow areas.
On a DSLR or Mirrorless camera, you can use a fast lens, that’s one with a large aperture, or reduce the frame rate and increase the time the shutter is open. However, with a webcam or smartphone, there is no physical aperture to adjust. The only option is to brighten the scene.
To brighten your scene, which includes you, try using window light or extra video lights. If the background colors are dark consider making a few changes, such as removing some items or adding lighter colors. If your clothes are dark change into something lighter.
If you just can’t brighten your background consider getting a white backdrop and set it up just behind you. Even if you can’t properly light it, the background will appear light gray, which is better than dark colors and shadows in your home office.
If you can spend some money on improving your setup this is what I would buy.
- Video light(s)
- White backdrop
- Better webcam
- A good camera that can be used as a webcam
Last update on 2025-10-11 / Affiliate links / Images from Amazon Product Advertising API
Tosh Lubek runs an audio and video production business in the UK and has been using the Canon EOS R since it was released in the Autumn of 2018. He has used the camera to shoot TV commercials for Sky TV, promotional business videos, videos of events and functions, and YouTube creator content. He has also won international awards for his advertising and promotional work. You can meet him by visiting his “video booth” at HashTag business events across the country.
Recent Posts
Most people use sandbags the wrong way. Here’s how to hang them properly on a light stand for maximum stability and safety — plus what to fill them with.
You're Using the Canon RF 50mm f/1.8 WRONG! Here’s How to Fix It
If you’ve recently picked up the Canon RF 50mm f/1.8 STM—affectionately known as the Nifty Fifty—you might be confused by that strange switch on the side of the lens. It doesn’t say AF/MF...