

DIY Video Studio is supported by its readers. Please assume links on this site are affiliate links, and that I get commissions for purchases made through these links. As an Amazon Associate, I earn from qualifying purchases. Thank you if you use any of the links.
It would probably be a stretch to say the Yeti uses software, since it’s more accurate to say, “what software can be used with the Blue Yeti”. Fortunately, whatever type of content creator you are, you will find plenty of audio and video software that will work with your Blue Yeti.
Blue Yeti audio software includes Adobe Audition, Audacity, and GarageBand. The Blue Sherpa software for Blue Yeti controls the microphone from a computer. Video editing software, like Premiere Pro, can also use the Yeti. However, Blue Yeti software downloads can also include mobile apps, since the Yeti is compatible with iOS and some Android devices.
I’ve created a list of software for the Blue Yeti. Although there are many more examples, I have restricted the list to software I have used on my Windows 10 PC and/or my iPhone or iPad. The list includes the software or apps most content creators, streamers, and remote workers will find useful. With each example, I also explain how to set up the software to use the Blue Yeti.
- Adobe Audition (music and voice recording)
- Adobe Premiere Pro CC (video production)
- Adobe Premiere Rush (mobile and desktop video creation)
- Audacity (music and voice recording)
- Blue Sherpa (Yeti mic control app)
- FiLMiC Pro (video camera)
- GarageBand (music and voice recording)
- iMovie for iOS (video production)
- OBS (video streaming and recording)
- Zoom desktop & mobile app (video conferencing)
Whether you’re a music maker, podcaster, or YouTuber I’ve included software you can use with your Blue Yeti. Many of the programs/apps offer both Windows and macOS versions. But mobile content creators don’t need to feel left out, with an adapter, the Blue Yeti will also work with iOS devices. If you’ve never considered recording with a Blue Yeti and iPhone or iPad, it’s worth having a go.
Although the Blue Yeti audio software in this article may be available for both Windows and macOS. In some cases, it may also be available for iOS.
My experience is based on working with the PC or iPhone/iPad version. I’m therefore drafting this article from the perspective of a Windows 10 or iOS user.
So, let’s take a deeper look at what audio and video software works with the Blue Yeti and how to set it up.
Adobe Audition audio software for Blue Yeti
Available for Windows and macOS.
Adobe Audition is a professional audio workstation that makes it easy to work with media across Adobe’s different apps. For example, changes you make to your audio in Adobe Audition will automatically update the audio in your video edit using either Adobe Premiere Pro or Adobe After Effects.
So, in the middle of editing a video, you can jump over to audition to tweak your audio, and immediately your changes will appear in your video timeline. No need to keep reimporting your updated audio files.
Audition is easy to understand and to get started with. Right out the box, it has all the tools you’ll initially need to record, edit, and create a multitrack mix. It also includes the tools you’ll need to repair your audio. For instance, get rid of noise, clicks, recover clipped audio, or boost files that seem far too quiet.
However, if you need additional effects, you can install VST and VST3 plugins. One that many podcasters will like is DeVerberate by Acon Digital. As the name suggests, it removes room reverberation or echoes from your audio. A very handy tool if you’re unable to record in studio conditions.
A feature I use all the time is the ability to open and edit the audio from a video file. Just open the video file as if it were any other audio file. You’ll be presented with the audio waveform and a floating video monitor. You can’t save the audio back into the original video file, but even so, Audition offers more precision over your audio processing than you’ll find in a video editor.
Audition was originally released by Syntrillium in 1997 and known as Cool Edit Pro. It quickly became popular with professionals from the music, broadcast, and video industries. However, users weren’t the only ones to be drawn to Cool Edit Pro. Adobe Systems spotted the value of the software and acquired Syntrillium Software![]() in 2003. In the process they changed the name from Cool Edit Pro to Audition, eventually making it part of Adobe’s Creative Cloud offering.
in 2003. In the process they changed the name from Cool Edit Pro to Audition, eventually making it part of Adobe’s Creative Cloud offering.
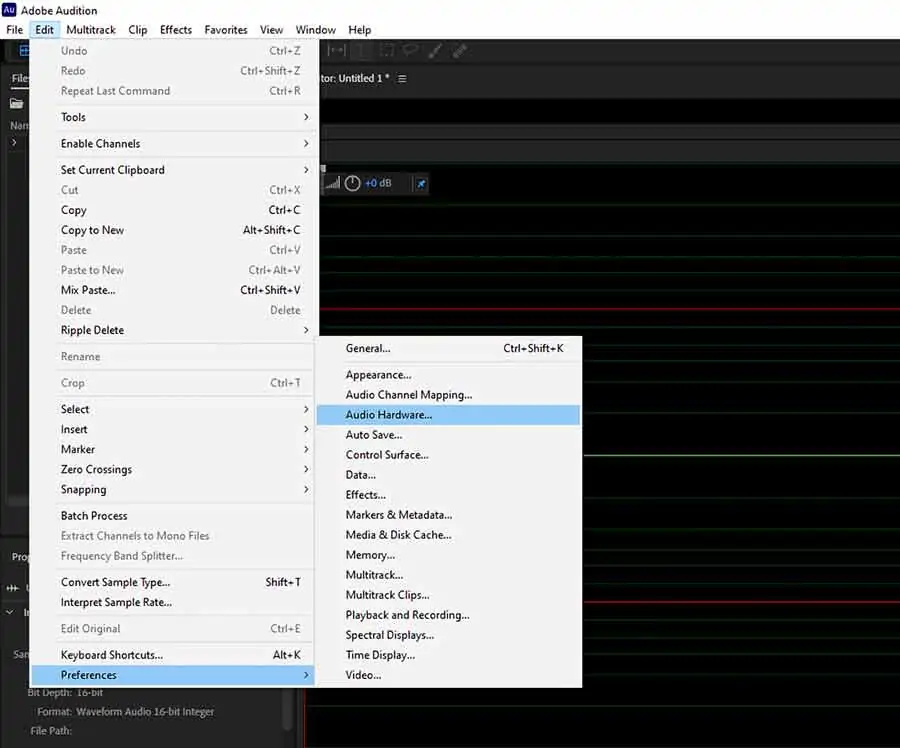
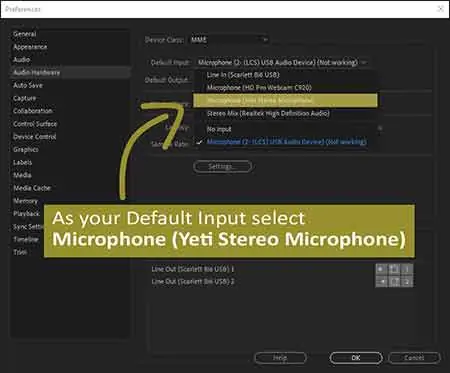
To use the Blue Yeti in Audition go you must select it as your audio input device in the app’s preferences. To do that, click on File > Preferences > Audio Hardware.
When the Preferences panel opens ensure the device class is MME and then click the down arrow on the Default Input box. From the drop-down list choose Microphone (Yeti Stereo Microphone), and then click OK.
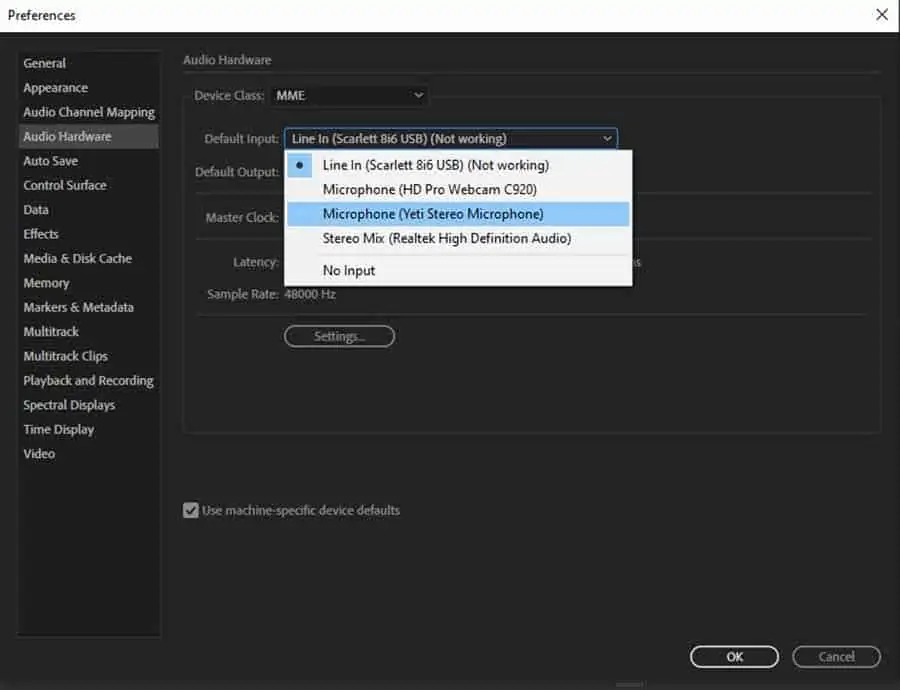
You can now create a New Audio File, select the Sample Rate, Channels, and Bit Depth, then start recording.
Adobe Premiere Pro CC software for Blue Yeti
Available for Windows and macOS
Premiere Pro CC is Adobe’s video editing software, and it’s an industry standard. Premiere Pro is capable of any video work, from performing simple edits to creating Hollywood movies. So, it’s not surprising that the software has a huge following among both amateurs and film/video professionals.
The editing software was originally called Premiere and released in 1991. It wasn’t until 2003 that the name changed to Premiere Pro.
I remember using it in the 1990s to edit my first professional video job, an open-air music festival in Aberdeen, Scotland. My use of the software was more-or-less conventional, I was editing the footage into a short promotional video. But around the early-mid-90s I came across what I thought was an unusual use of Adobe Premiere.
One of the PC magazines I used to read ran a story about how a church was using Adobe Premiere. They were making what we would now call a podcast and using Premiere to record and edit the audio.
Today, Premiere wouldn’t be my first choice as an audio editor, but in the early to mid-90s the choice of audio editing software for Windows was limited. A popular program among broadcasters was SAW (Software Audio Workshop). It was the first DAW I used for creating radio advertising, but subsequently moved over to Cool Edit Pro 3.0/3.1
Returning to Adobe Premiere Pro, I use the software for most of my video work. This includes YouTube tutorials, corporate videos, and TV spots.
The interface is reasonably intuitive and straightforward. If you have used one of the simple video editors that are often bundled with a PC, you will understand the principles used by Premiere Pro CC. The timeline includes stacked video and audio tracks, allowing even complex mixes to be created.
Like Audition, you can use VST and VST3 plugins with Premiere Pro CC. If you’ve already installed an audio plugin for Audition, there’s a good chance it’ll also work in Premiere.
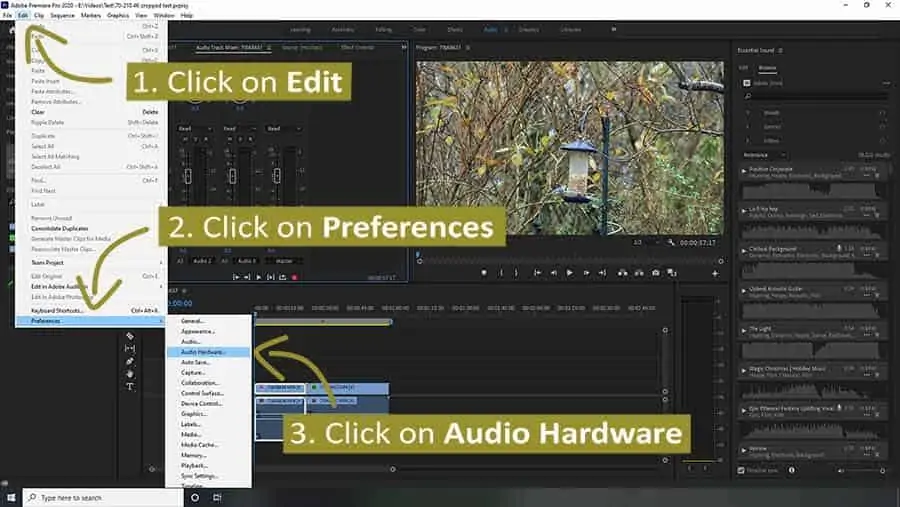
To use your Blue Yeti in Premiere Pro CC click on Edit in the menu bar, then select Preferences, and click on Audio Hardware.
In the Preferences panel that opens click on the down arrow of the Default Input window and select Microphone (Yeti Stereo Microphone). Finally, click on OK.
If you’re using a Blue Yeti alongside Adobe Premiere Pro CC, there’s a good chance you’ll be releasing your videos on YouTube and other social media platforms. One advantage of working with Premiere Pro CC is the Auto Reframe feature. It intelligently identifies where the action is taking place in your clip and reframes the shot for a different aspect ratio. You start off with your original landscape or 16:9 video, and Premiere will reframe it to be square 1:1 or vertical 9:16.
You’ll be able to film once but export versions that are ideal for posting to Instagram, YouTube, and Facebook. It’s a terrific way to increase your productivity.
Adobe Premiere Rush software for Blue Yeti
Available for Windows, macOS, iOS, and Android
Premiere Rush is a newer video editor from Adobe that is for mobile devices and computers. It has replaced Adobe’s previous release for this category, which was Adobe Premiere Clip.
Premiere Rush is a simple but extremely useful video editor. It doesn’t give you the editing power you’ll find in Adobe Premiere Pro CC, but you can always start a project on your phone using Rush and then export it to Premiere Pro CC to add any necessary refinements.
Premiere Rush is a cross-device video editing solution that allows users to quickly edit and create video content for social media, like YouTube and Facebook. Although it can be used on a desktop or laptop, Rush is ideal for mobile users who want to shoot, edit, and publish straight from their phone or tablet.
Adobe Premiere Rush lets you edit your clips, adjust the color and audio, and add text and titles, with simple easy-to-use tools. You can access customizable Motion Graphics templates, as well as content from Adobe Stock.
The free Starter Plan for Premiere Rush is available when you sign-up for Adobe’s free Creative Cloud membership. This includes 2 GB of Cloud Storage, unlimited free exports on Premiere Rush mobile, and up to three exported projects on Premiere Rush desktop.
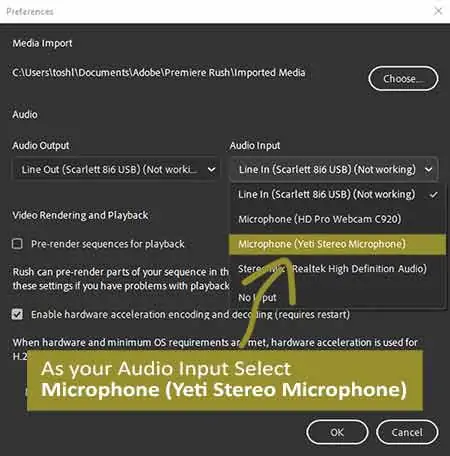
To use the Blue Yeti in Adobe Rush, open Rush, click on Edit, and in the drop-down menu click Preferences. In the Preferences, panel click the down arrow of the Audio Input selection window and click Microphone (Yeti Stereo Microphone). Finally, click OK to save the changes.
You can now add a voiceover to your video project by clicking on the “+” button under the Home icon, choosing “Voiceover”, and then clicking on the red record button beside the voicer track in the video timeline. You will see a countdown on the screen prompting you to start your voice recording. Once you’ve finished, click the red button again and the audio waveform of your recording will be displayed in the voiceover track.


Last update on 2026-03-13 / Affiliate links / Images from Amazon Product Advertising API
Audacity audio software for Blue Yeti
Available for Windows, macOS, and Linux
Considering Audacity is free software, it’s surprisingly powerful and useful. Not only that, but it’s also a cross-platform app, with versions for Windows, macOS, and Linux.
Although Audacity’s installation is straightforward it’s a bit more involved than that of Adobe Audition. After installing Audacity you’ll also need to download and install other elements so that you can import and export certain file types etc. Even so, the program allows you to record, edit, and process your audio. It’s also possible to build up multitrack audio projects, although I prefer doing that using different software.
One disappointment with Audacity is that some of my bought VST and VST3 plugin filters don’t work, but that’s a minor grumble. After all, if you’re prepared to pay for filters, you’ll probably also pay for a DAW.
You can download Audacity![]() from the official Audacity website. You’ll find versions for Windows, macOS, and Linux.
from the official Audacity website. You’ll find versions for Windows, macOS, and Linux.
To use your Blue Yeti with Audacity, click on Edit and then Preferences. When the Preferences panel opens open the device dropdown window under Recording and select Microphone (Yeti Stereo Microphone).
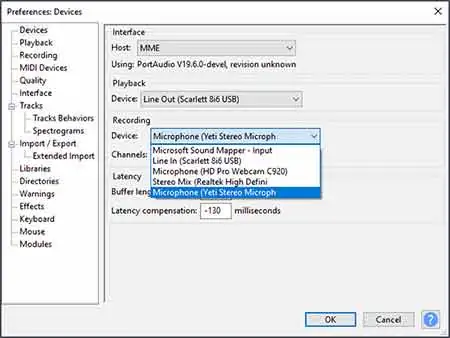
Under recording, you can also choose whether you record one (mono) or two (stereo) channel audio. Once you’ve made the changes click on OK.
However, in Audacity there is an alternative way to choose the audio input device, and how many channels to record. This can be done straight from the Audacity main interface.
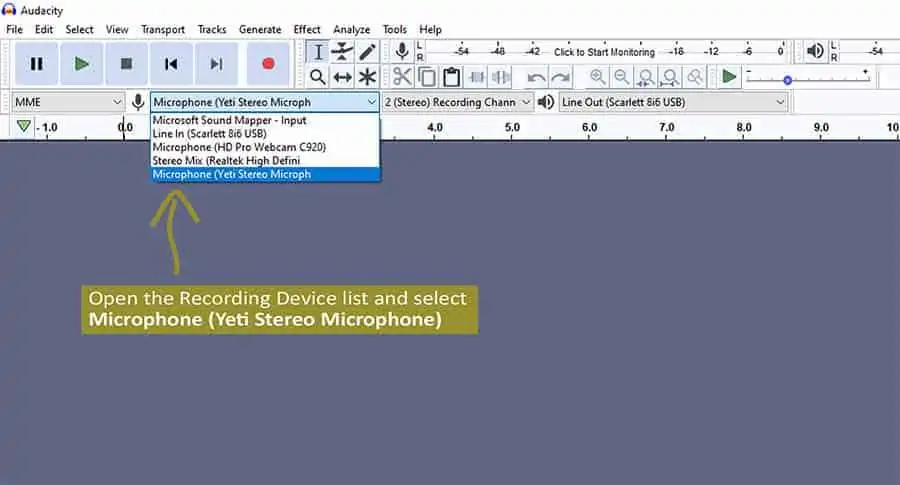
In Audacity look below the toolbar and transport controls. You should see a microphone and speaker icons, with dropdown device lists beside each. To select your Blue Yeti, open the recording device list, and click on Microphone (Yeti Stereo Microphone).
Next to the speaker icon, you can choose the output device, which can also be your Blue Yeti. You might not appreciate that your Blue Yeti, as well as being a microphone, is effectively an external sound card. If you select the Yeti as an output device and attach headphones to the 3.5mm socket on the base of the Yeti, you will be able to monitor both the output from the Yeti and your computer sound.
Blue Sherpa software for Blue Yeti
Available for Windows and macOS
If you’ve ever asked the question, does the Blue Yeti have software, the answer is yes. The Blue Yeti does have software of its own. It’s called Blue Sherpa and it can be downloaded from the Blue Designs website.
Unlike the other software I mention in this article, Blue Sherpa is not a recording software for the Blue Yeti. However, I felt it worth mentioning because it enables some control over the Blue Yet without having to go into your operating system’s sound control settings.
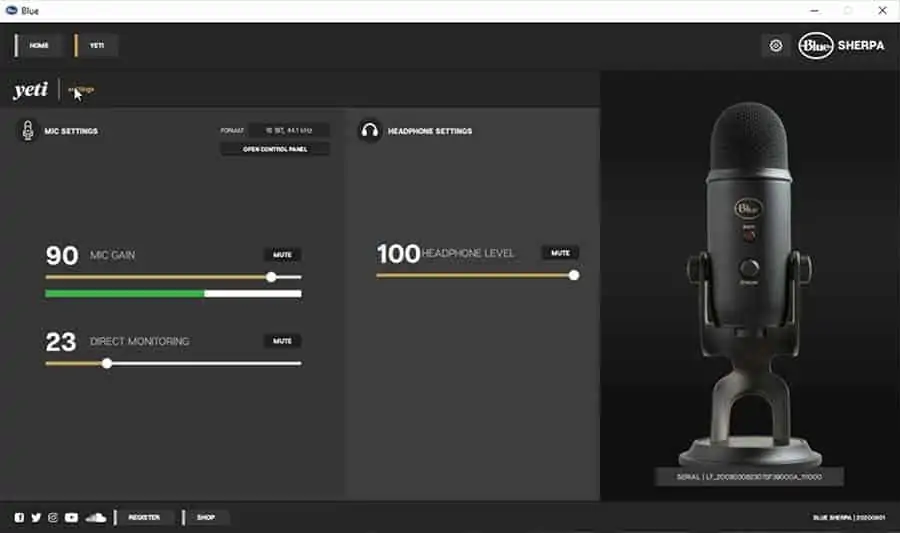
Blue Sherpa enables easy remote control of the Yeti’s gain and headphone volume. This can help reduce the need to touch the microphone and therefore cut down on handling noise.
If you are familiar with sound mixing desks, you can think of the Yeti’s Mic gain and Headphone volume knobs to be like the course gain dials on a mixing desk. Meanwhile, the sliders in Blue Sherpa are light the faders on the mixing desk.
You can read more about the Sherpa software for the Blue Yeti in my full article on the topic: Blue Sherpa Software: How to download, install, and use with Yeti![]() .
.
The Blue Yeti does not come with other software, such as drivers since your operating system should take care of the installation.
To use the Blue Sherpa app with your Blue Yeti you don’t need to do much other than download and install the software and then connect your Yeti to your computer.
Although the amount of control with the Yeti is limited, it’s still my favorite method of controlling the levels on my Blue Yeti. If you have a Yeti X the Sherpa app will provide much more control, including the ability to apply live audio processing to your microphone’s output.
FiLMiC Pro software for Blue Yeti
Available for iOS and Android
If you’re a budding mobile filmmaker, this is one camera app you must try. My preference is to use FiLMiC Pro on an iPhone or iPad rather than an Android device. This is simply because on an Apple device I know FiLMiC Pro will behave consistently.
But on Android, the different phone manufacturers can diverge slightly in the way they implement the technology. This can result in FiLMiC Pro not behaving identically on different Android Phones. It’s also true that not all implementations of the Android OS will allow you to connect your Blue Yeti to your phone. Because of that, here I’m only going to deal with the iOS version of FiLMiC Pro. But if you can connect your Yeti to your Android device FiLMiC Pro should work similarly.
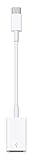
It’s not generally appreciated that you can use a Blue Yeti with an iPhone or iPad. To do so, you’ll need an Apple Lightning to USB Camera Adapter or Lightning to USB3 Adapter. You can find full details in my article How to connect and use a Blue Yeti to an iPhone or iPad.
Open FiLMiC Pro and then go into the settings and choose the Audio settings. If you now connect your Yeti to your iOS device, you should see the device automatically selects the Yeti as the default audio input.
If everything goes correctly, you should see Yeti Stereo Microphone appear in the top bar of the Audio settings panel. If desired, you can change the audio input using the arrows.
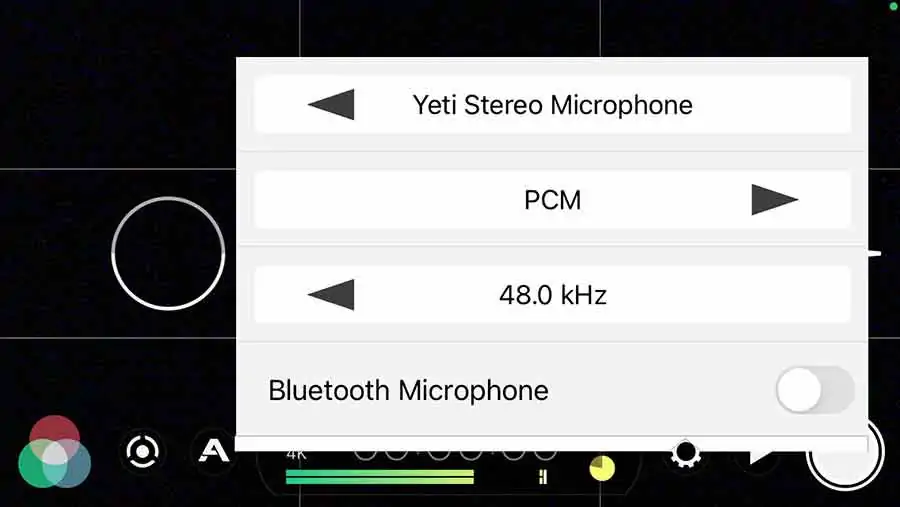
Once your Blue Yeti is selected you can close the Settings panel and start recording video footage with FiLMiC Pro, where your Yeti will be the audio source.
Last update on 2026-03-13 / Affiliate links / Images from Amazon Product Advertising API
GarageBand audio software for Blue Yeti
Available for macOS and iOS (can be made to work under Windows)
GarageBand for Mac is one of the most popular audio apps among music creators. This is because it turns your Mac into a fully featured music creation studio and because Apple has made GarageBand free to download![]() . So, it makes a lot of sense to at least try using your Blue Yeti with GarageBand.
. So, it makes a lot of sense to at least try using your Blue Yeti with GarageBand.
Blue Microphones recommends that you connect your Yeti directly to your mac computer using the USB cable that came with your microphone rather than using a USB hub.
Check the Mute button on the front of the Yeti. The LED light should be a solid red. This indicates that the Yeti is connected to your computer and unmuted. If the Mute button is blinking red, this means that the microphone is muted. If the Yeti is muted, press the Mute button once and the light should become a solid red.
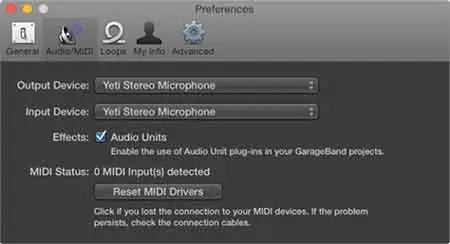
Once you have connected your Blue Yeti open GarageBand and select New Project, and double click Vocal. Next, go to the GarageBand drop-down menu, select Preferences, and click Audio/Midi.
Here you can choose the Input and Output device. Since Your Blue Yeti is effectively both a microphone and sound card choose Yeti Stereo Microphone as both your Output Device and Input Device.
With the Input and Output set to your Yeti USB microphone, you can now close Preferences.
You can now proceed with recording using your Yeti and GarageBand on a Mac.
If you’re a Windows 10 user you can still access GarageBand, even though it’s Mac software. There are several ways you can do this, but not all are recommended. One of the best methods of running GarageBand on a Windows PC is to use VMware![]() . This enables your PC to run as a Virtual Machine. GarageBand on PC
. This enables your PC to run as a Virtual Machine. GarageBand on PC![]() has full details of how to download and install GarageBand on Windows PC using VMware.
has full details of how to download and install GarageBand on Windows PC using VMware.
I don’t use this method myself, so I cannot say how successful or safe the method is. However, GarageBand on PC says it is their recommended method and the one they use. It produces no lag and exports that are easier and faster.
You can also use GarageBand on iOS. This is what I do, running the app on my iPhone and iPad.
As I mentioned in the previous section on FiLMiC Pro, you can record into an iPhone or iPad using a Blue Yeti. For details on connecting your USB microphone and your iOS device see my article How to connect and use a Blue Yeti to an iPhone or iPad.
Once you connect your Yeti and iOS device you should see a notice saying Audio Device Connected, as you can see in the screengrab below.
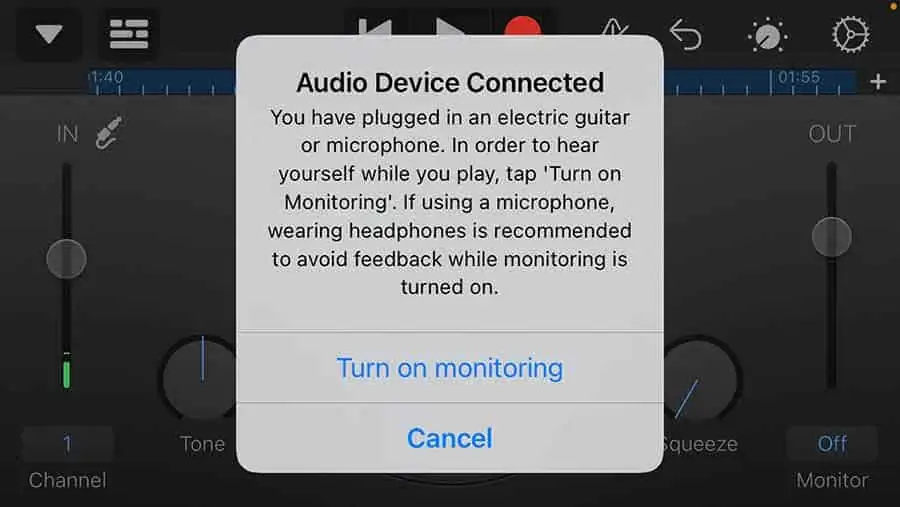
The notice shows that the Yeti has been automatically selected as your audio source in GarageBand. The notice also advises you to turn on monitoring and to wear headphones to avoid feedback while monitoring is turned on.
iMovie video mobile editing software for Blue Yeti
Just like FiLMiC Pro and GarageBand, iMovie for iOS will automatically connect to your Yeti and be available as your sound source.
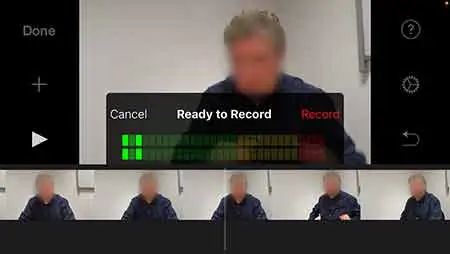
Using a Lightning to USB Camera Adapter, connect your Yeti to your iPhone or iPad. Then open iMovie for iOS and either start a new project or open an existing project. Place the play-head bar at the point you want your voiceover to start and then tap the “+” icon on the left side. When the menu opens, scroll down, and select Voiceover. The record panel will open indicating iMovie is ready to record. Use the audiometer to check your voice level, using the Gain knob on the Yeti to make any necessary adjustments. Once your audio level is set, tap on Record. You’ll see a countdown as the play-head approaches your chosen starting point to help you start your voiceover at the right moment.
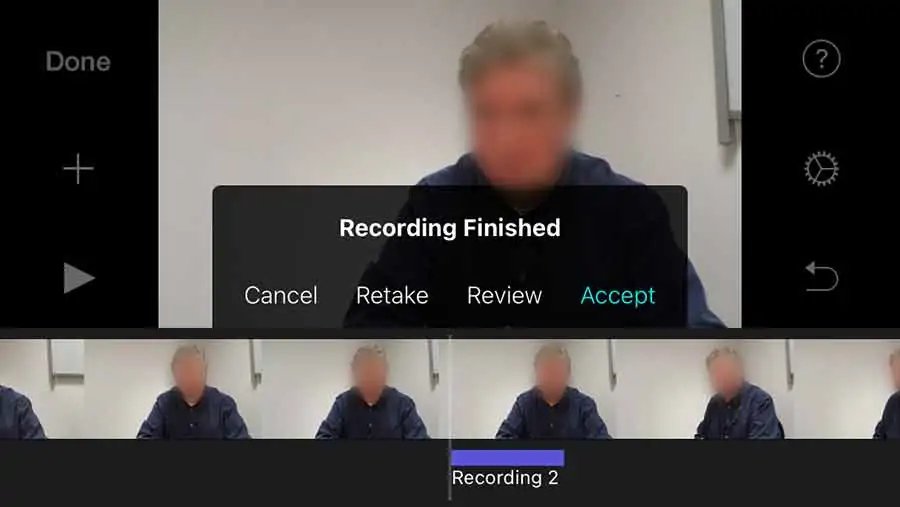
Once you have finished recording your voiceover, tap on Stop and the Recording panel will change and your recording will appear as a bar in the video timeline. You will see four choices on the screen, they are Cancel, Retake, Review, or Accept. If you are happy with your recording you can tap Accept.
There are many other audio and video apps for iOS that will also work with your Yeti. In most cases, you just need to connect your Yeti to your iPhone or iPad using the appropriate adapter and then open the app. You will know that they are connected because the red LED on the Yeti’s mute button will light up.
If for some reason you lose the connection, unplug, and re-plug the Yeti.
OBS Studio video streaming software for Blue Yeti
Available for Windows, Mac, and Linux
OBS, or Open Broadcaster Software, is free open-source software for video recording and live streaming. It’s one of the quickest and easiest ways to start streaming on Windows, Mac, or Linux.
OBS Studio can be downloaded from the OBS Project website![]() .
.
The software allows real-time video and audio capture and mixing. You can prepare an unlimited number of scenes that are made up of multiple sources. These can include window captures, images, text, browser windows, webcams, video capture cards, and more. You can then switch seamlessly between these scenes with custom transitions.
In the OBS audio mixer, you can apply various filters to your Blue Yeti audio source. This can include a noise gate and noise suppression, but if you have some VST plugins you can use those too since OBS offers VST plugin support.
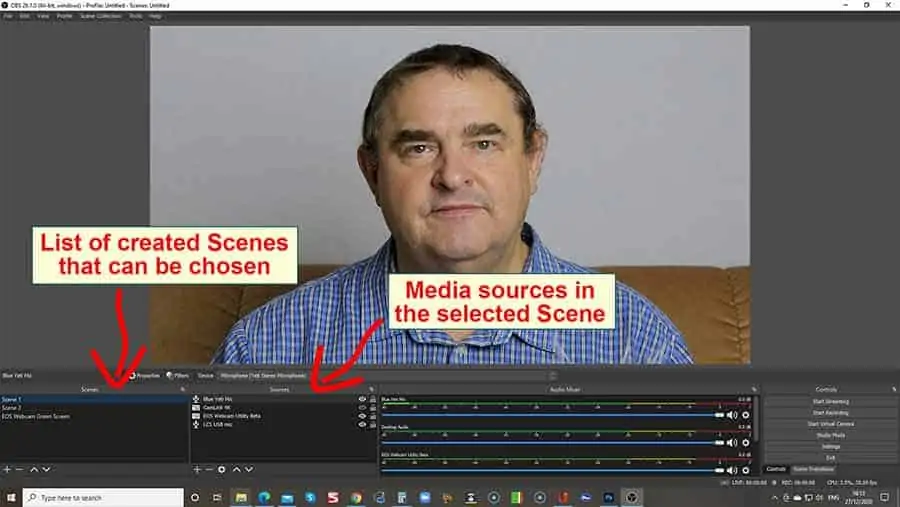
To create a scene that includes the output from your Blue Yeti you can do the following.
- In the Scenes panel, click on “+” to add a new scene. Give it a name and click OK.
- Make sure you select the scene by clicking on it and you can then add sources in the Sources panel.
- Click the “+” below the sources panel and choose Audio Input Capture.
- In the Create/Select Source window that opens you can choose an existing source or create a new one. If you’ve not previously made your Yeti a source, click the Create New radio button and type Blue Yeti in the bar. Now click OK.
- The Properties window will open. Click anywhere in the Device bar to reveal the available audio devices and click on Microphone (Yeti Stereo Microphone) from the list and click OK.
You now have a scene that only has your Blue Yeti as a source. You can add further sources, such as a webcam or video capture device, in a similar way.
Zoom video conferencing software for Blue Yeti
Available for Windows, Mac, iOS, & Android
If you’ve read this far you’ve probably guessed, correctly, that you can use your Blue Yeti with Zoom on both your computer and iPhone/iPad.
If you want the setup to be Easy-Peasy-Lemon-Squeezy, or trouble-free, use your Yeti with the Zoom mobile app and an Apple Lightning to USB Camera adapter.
You might be OK using a third-party adapter, but I always recommend using the genuine Apple product. Yes, it is more expensive, but you have peace of mind that it works.
I’ve tried third-party adapters and they don’t always work. Some that did work failed after an Apple iOS update. However, I’ve not any had problems with the real Apple adapter. That’s even true when using my old, and now unsupported, iPad 4.
So, link the Yeti’s USB cable to the adapter and then plug that into your iOS device. Once connected you’re done. No setup required because your iPhone/iPad automatically selects the Yeti as your audio input for use with any app that requires a microphone.
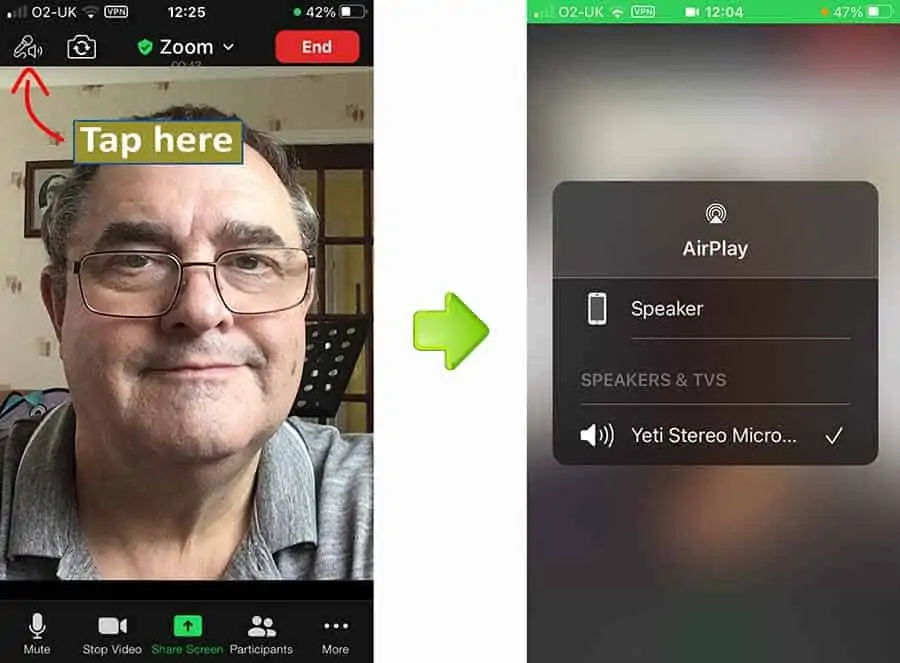
You can check that the Zoom mobile app is using your Yeti by tapping on the microphone/speaker icon above the video preview area (see the image below). This will reveal a screen that shows the Zoom mobile app is using your device’s speaker and Yeti Stereo Microphone.
Setting up Blue Yeti in the Zoom Desktop app
In my experience using a Blue Yeti with the Zoom desktop app involves a couple of steps. Choosing the Yeti in the Zoom audio settings is not always enough, I’ve also had to select the Yeti as my Audio Input device in my Windows 10 Sound Settings.
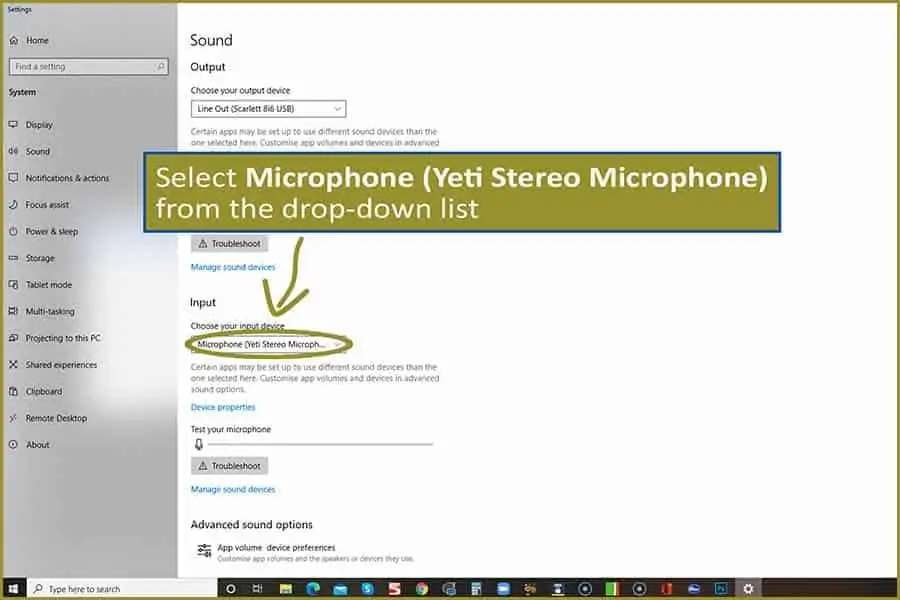
First, make sure the Yeti is also selected as your Windows audio device. So, type Sound Settings into the Windows search bar and open Sound Settings.
Under Input choose Microphone (Yeti Stereo Microphone) as your input audio device. See the image below for reference.
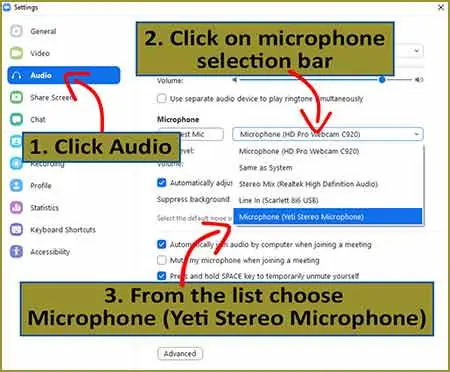
Now open the Zoom desktop app and click the settings gearwheel. To open the audio settings, click on the Audio tab. See the image below.
Once the audio settings open click on the Microphone selection bar to reveal the available audio input devices. Then select Microphone (Yeti Stereo Microphone) from the drop-down list.
Finally, you can do a test to check that everything is working. Under Microphone, click the Test Mic button and start speaking. You should see the blue volume meter move up and down as you speak. After a few seconds, you should hear a recording of yourself as confirmation that everything is working correctly.
Last update on 2026-03-13 / Affiliate links / Images from Amazon Product Advertising API
Questions people also ask about the Blue Yeti USB microphone
What is the best setting for Blue Yeti?
The best way to use your Blue Yeti is to do so in conjunction with the Blue Sherpa app. The Sherpa app makes controlling the Yeti both easier and quicker, without the need to touch the microphone.
Consider the Mic Gain and Headphone volume knobs on the Yeti as the coarse gain control that sets the maximum level. You can then use the sliders in the Sherpa app as a fine adjustment from zero level to the maximum set by the knobs on the microphone’s body.
Generally, the best setting for the Blue Yeti is to have the Mic Gain knob set to about halfway. You can then use the MIC GAIN slider in Blue Sherpa to control the level of your microphone. As you change the position of the MIC GAIN slider you will see the peak level on the audiometer change.
For your ideal audio level, you want the meter to remain in the green and yellow. Adjust the slider so that the meter does not reach into the red. Make sure the meter does not hit the end of the meter on the extreme right. If that happens your audio will be peaking and may result in audio clipping and distortion.
Does Blue Yeti have Bluetooth?
The Blue Yeti microphone does not include Bluetooth. Instead, the digital connection used by the Yeti is the USB port on a Mac or Windows computer. The Blue Yeti Pro also has the option of an analog connection between the microphone and an audio interface or preamp by using an XLR cable. Mobile users can record with the Blue Yeti on iOS devices by using Apple’s USB to Lightning Camera adapter.
Can you connect a Yeti microphone to an iPhone?
As indicated above, iPhones and iPads can use a Blue Yeti as a USB microphone provided an Apple USB to Lightning Camera adapter or USB 3.0 to Lightning adapter is also used. In both cases, the standard mini-USB to USB 2.0 cable that came with the Yeti is connected to the base of the microphone. Then the USB 2.0 (USB A) plug is inserted into the Apple adapter. This in turn is inserted into the Lightning port on the iOS device.
You can read full details in my article How to connect and use a Blue Yeti to an iPhone or iPad.
How to hear yourself on a Blue Yeti mic?
The best way to monitor with your Blue Yeti is to do this through the Yeti rather than your computer. Plug your headphones into the 3.5mm headphone socket on the base of the Blue Yeti.
However, you most likely won’t hear anything yet.
You need to go into the Sound panel of your Windows Control Panel to make two changes. In the Recording tab you need to set Blue Yeti as your default device. Then in the Playback tab set the Blue Yeti as your default speakers.
I know this sounds strange for a microphone, but the Yeti is also a sound card and by setting the Yeti as your speakers you will hear both your voice/or instrument as well as anything being played by the audio software on your computer.
I give step by step instructions with images in my article How to connect a Blue Yeti to a camera![]() .
.
How do you turn off a Blue Yeti?
The Blue Yeti does not have a physical nor virtual on/off button. From the moment you connect the Yeti and your computer (or iOS device) using the USB cable, the Yeti is fully powered-up. However, the microphone is not necessarily live, meaning that it can be “heard” by your recording or livestreaming software.
Even so, you can mute or disable the Blue Yeti in your OS sound controls. In Windows 10 this can be done in the Control Panel settings for the speaker playback. However, using the Blue Sherpa app is much quicker. Turn off the Yeti by clicking on the MIC Gain MUTE button. You will still hear the Yeti in your headphones unless you also mute the Direct Monitoring.
Tosh Lubek runs an audio and video production business in the UK and has been using the Canon EOS R since it was released in the Autumn of 2018. He has used the camera to shoot TV commercials for Sky TV, promotional business videos, videos of events and functions, and YouTube creator content. He has also won international awards for his advertising and promotional work. You can meet him by visiting his “video booth” at HashTag business events across the country.
Recent Posts
Most people use sandbags the wrong way. Here’s how to hang them properly on a light stand for maximum stability and safety — plus what to fill them with.
You're Using the Canon RF 50mm f/1.8 WRONG! Here’s How to Fix It
If you’ve recently picked up the Canon RF 50mm f/1.8 STM—affectionately known as the Nifty Fifty—you might be confused by that strange switch on the side of the lens. It doesn’t say AF/MF...