

DIY Video Studio is supported by its readers. Please assume links on this site are affiliate links or ads, and that I get commissions for purchases made through these links. As an Amazon Associate, I earn from qualifying purchases. Thank you if you use any of the links.
Is the Blue Yeti good for streaming? That’s a question I hear all the time, and it’s a question that frequently gets conflicting replies. There are plenty of people who love the Blue Yeti microphone and just as many who hate it.
If you’ve recently bought a Blue Yeti and are feeling frustrated because your Blue Yeti sounds bad, don’t worry. This article will help you improve your Blue Yeti’s sound quality so that you sound professional in your podcasts, YouTube videos, and live streams. Although I will give you full details, here are the top 9 tips to making your Blue Yeti sound better.
- Get close to the mic.
- Use one microphone per person.
- Only use the Cardioid pattern.
- Choose the best Blue Yeti settings
- Avoid direct contact between the Blue Yeti mic and your desktop.
- Get a good-quality USB extension to position the mic correctly.
- Speak into the sensitive side of the Blue Yeti.
- Use a pop filter or windscreen to stop plosives.
- Reduce the background noise.
Why does my Blue Yeti sound bad?
If you think that your Blue Yeti sounds bad, don’t panic, and don’t send it straight back to the seller. Unless your parcel got damaged while being delivered, the likelihood of your Blue Yeti being faulty is low.
Despite what some people say, the Blue Yeti is a good USB microphone. I have one in my sound booth, and I do use it for casual recordings without any problems. But I don’t use it for professional sessions for radio or TV commercials or spots.
What I’m saying is that the Blue Yeti isn’t a professional-sounding mic, however, nor does it come with a professional microphone price ticket. For live streaming, YouTube videos, and conference calls the Yeti is fine. This is especially true if you want a solidly built microphone, that sounds and looks good, and provides the simplicity and convenience of a USB connection.
This brings me back to the question of why some people think their Blue Yeti sounds bad.
Is the Blue Yeti Bad Quality?
If you are expecting a microphone that lets you record good USB audio, you’ll think the Blue Yeti is a good quality mic. When you want to record casual audio for YouTube, live streams, and podcasts, it’ll do the job. But if you want to record professional audio, or up your game for YouTube, live streams, and podcasts then you might consider the Blue Yeti bad quality.
First, the Blue Yeti is not a professional microphone, so don’t expect it to sound like a pro mic setup.
It doesn’t have a price ticket of $700+ that you’d expect of a professional mic setup. You see, the Yeti plugs straight into a computer’s USB port, whereas a professional condenser microphone needs more equipment. Your mic needs to be plugged into a mic preamp that plugs into a USB audio interface, which then plugs into a computer.
The reality is that a professional mic sounds better than a Yeti because the kit includes better quality components, there are more parts, and it all comes at a higher price. Like in so many things, you get what you pay for.
But putting the technical issues aside, the biggest reason people have problems with the Blue Yeti is that they do not know how to make it shine to its full potential. But isn’t that the case with anything? Until you’ve learned how to use some equipment or software, you’ll struggle to use it properly.
So, let’s look at how you can make your Yeti sound better.
How to make my Blue Yeti mic sound better
The Blue Yeti might be a Plug’n’Play USB device, so you don’t need to install drivers, but that doesn’t mean you can start recording with no knowledge of how the microphone works.
Most of the time when the Blue Yeti sounds bad it’s because it’s not being used right or positioned correctly. You see, the Blue Yeti doesn’t necessarily work the way you might think it does.
Use one microphone per person

Blue Microphones will tell you that you can use a single Yeti to record a one-on-one interview by choosing the bi-directional mode or pattern. That’s the pattern that looks like a figure of eight of two touching circles.
You can also set the mode to omnidirectional and have a few people sit around the Yeti, since it will pick up sound equally from all directions.
Although both these modes will work, in practice, the setup won’t give you good audio, unless you huddle up close to the mic.
I used to work for various radio stations in Scotland and no studio interview was ever recorded using a single microphone. The rule was one microphone per person.
With a dedicated microphone for each contributor, each person will sound good, and you’ll be able to balance all the voice levels. It doesn’t matter whether you speak louder than your guests, with separate mics you can adjust the levels to match. That’s never going to be possible if you are all sharing one microphone.
You need to get closer to the microphone
No matter what microphone you use to record sound for your videos, there’s one universal rule you need to follow to record good audio. The mic should be about 6-12 inches from your mouth. You’ll always sound best at that distance.
But here’s the problem. The main target of Blue Microphone’s marketing has been the game streamer, but that kind of user will be the least likely to put a desktop microphone right in front of them. What they want directly in front of them is their keyboard to control their PC game.
Realistically, no gamer is going to put their bulky Blue Yeti between them and their keyboard. The Yeti will end up being sat off to one side of the PC keyboard, which isn’t ideal.
First, the mouth-to-mic distance is going to be more than the ideal 6-12 inches. Second, the gamer won’t be speaking in the direction of the microphone.
Usually what happens is that the user will turn up the audio gain on the Yeti to compensate for the fact that they’re now further from the mic and sound quieter. That’ll kind of work, but by making the Yeti more sensitive to sound, it’ll also raise any background sounds, including keyboard sounds and the reverberation of their voice in the room. The result is dreadful audio.
So, whatever you do, keep the distance between you and your Yeti in that sweet spot of 6-12 inches. That means getting the Yeti up to the height of your mouth. Here’s how to do it.
If you’re not a gamer, say you’re conducting an interview or presenting a podcast, put your Yeti on a taller stand.
The stand that comes with the Yeti is robust and it’s heavy enough to stay put on your desk. But, unless you’re sitting low down, the Yeti stand isn’t tall enough to get the up to your mouth height.
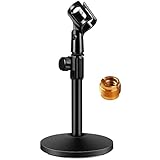
- Larger Base Diameter and Heavier Weight: Enhanced with a sturdy metal base measuring 5.12" in...
- Adjustable Height: Effortlessly adjust the desktop mic stand's height from 10.6" to 15.4" with a...
- Upgraded Load bearing Capacity: High quality metal material ensures an excellent load bearing...
- Strong Compatibility: With a 3/8" to 5/8" adapter, the desk mic stand is compatible with Blue Yeti,...
Last update on 2026-03-13 / Affiliate links / Images from Amazon Product Advertising API
Something like the InnoGear desktop adjustable microphone stand will do. You need to fit the included 5/8″ Male to 3/8″ Female Screw adapter that then screws into the base of the Blue Yeti. If you’ve never paid much attention to the base of your Blue Yeti, the big circular hole is a universal 5/8” threaded mic mounting point. You can now get the Yeti close to your mouth and consequently record good audio.
Choose the best Blue Yeti settings
The Blue Yeti is a very sensitive microphone with a high output signal. This could lead to peaking or clipping in your recordings or live streams, which is undesirable. Badly clipped audio may be distorted, making it very unpleasant to listen to. This will be the case if you see the audio level meter in your recording or streaming software hitting the end stop and turning red. But don’t worry, you can transform your Blue Yeti audio from lousy to legendary by changing your Blue Yeti settings.
To choose the best Blue Yeti settings adjust two things. Set your Mic Input Volume to about 30-40% in your computer’s sound settings. Then turn the indicator line on the Yeti’s Gain dial to about halfway, or the 12 o’clock position. Now test your audio level using the audio level meter in your software.
Pro Tip: You want your voice level to peak in the green part of the audio meter (around -12dB). If you are at the correct distance from the mic, you should sound good while background sounds are minimized.
Only use the Cardioid pattern
Now that you have the Yeti at the correct height and distance from your mouth, you need to choose the best mic pick-up mode or pattern.
If you look on the reverse side of the Blue logo, you’ll see the pattern selection knob. The third position, going clockwise, is the cardioid pattern. It’s marked with a kind of heart shape, without the pointed bottom.
The cardioid pattern that most people will want to select. It makes the microphone most sensitive in one direction, and less sensitive off to the sides and rear. An audio engineer would talk in terms of the microphone rejecting sound coming from the rear and sides. This allows your voice to stand out from background noise coming from those other directions.
Avoid direct contact between the Blue Yeti mic and your desktop
Many microphones, including the Blue Yeti, are sensitive not only to sound that passes through the air but also sound waves that pass through solids.
That can be a problem if your Yeti is sitting on your desk and so is your computer box, or if you knock your desk or are tapping at your keyboard. You might not notice any of those noises while recording, but they’ll become very apparent when you listen back to your recording.
Solids can be highly effective at transmitting sound from the source of the background noise to the Yeti. If this is a problem for you, try isolating your mic from your desk. The simplest thing to do is to place some rubber matting under your mic stand, although it might not be completely effective.
Another way of isolating your Yeti from your desk is to use a boom mic stand or a mic scissor arm.
With a boom mic stand the stand rests on the floor instead of your desk. While a scissor arm attaches to your desk, you then hang the Yeti from a shock mount that effectively isolates the Yeti from the scissor arm, and therefore from the desk.
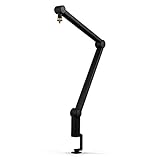
- Broadcast studio-grade design with enclosed aluminum construction and internal springs.
- Hidden channel cable management system for sophisticated on-camera looks.
- Hand-tightened friction hinges for smooth, quiet operation.
- 32-inch reach and 360-degree rotation.
Last update on 2025-10-11 / Affiliate links / Images from Amazon Product Advertising API

- Blue Compass PREMIUM MICROPHONE BOOM ARM is not included and sold separately.
- Blue Radius III custom shockmount is designed especially for Yeti and Yeti Pro Microphones,...
- Elevate your audio recordings with Radius III custom shockmount to shield your microphone from...
- This universal mic shockmount cradles the mic in style and features a new streamlined, lightweight...
Last update on 2025-10-11 / Affiliate links / Images from Amazon Product Advertising API
With the Yeti isolated from your desk, it won’t pick up any knocks, keyboard taps, or the hum of your computer through the mechanical transmission of sound.
I have both a desktop stand and scissor arm for my Blue Yeti and both have their advantages. The desktop stand is easy to set up and tidy away and takes up little space.
However, the scissor arm, although it’s more time-consuming to set up, offers more flexibility. You can place the Yeti exactly in front of your mouth and even move it around with one hand if you move your head around. Your Yeti mounted on a scissor arm will also appear more professional to your YouTube viewers.
Get a good USB extension cable for your Yeti
The USB cable that comes with the Yeti is not exactly short, but if you want to get the microphone away from your PC box or laptop, you’ll need an extension. You’ll also need an extension if you plan to have your Yeti in a sound booth but your PC on your desk.
That’s the exact setup I have in my office. My audio/video editing workstation is on my office desk and my sound booth is in the corner of the room. A long extension connects my Yeti to my computer.
However, don’t overdo the extension. Several feet of USB extension is OK, but don’t expect to run the cable halfway around your house.
Speak into the sensitive side of the Blue Yeti
A frequent problem that leads to many inexperienced content creators thinking their Yeti sounds bad is that they use their Blue Yeti incorrectly.
Considering how many times we see people speaking on TV into the tip or the end of a microphone, it’s not surprising that folk try doing the same with a Yeti. Although it may seem instinctively correct, it’s the wrong way to use this microphone.
The Yeti is a “side-address” microphone. That means you must speak into the side of the metal grill, but not just any side. You should speak into the side that has the Blue Microphones logo.
Remember, you should be using the cardioid mic pattern so only the side with the logo will pick you up clearly. The two sides and the opposite side is where the microphone will be rejecting sound. If you try speaking from any of those positions, you’ll sound quiet and bad.
Use a pop filter or windscreen to stop plosives

Have you ever noticed the sound “popping” or “blasting” when a speaker gets really close to a microphone?
Those are the plosive sounds in words starting with Ps and Bs giving the microphone element a hard time. The sudden rush of air literally batters the microphone element, overpowering the input and leading to those pops and blasts.
However, there is a way you can make your speech sound clear and pop-free. You need to use a windshield or pop filter.
A windshield is a shaped black foam that slides onto the business end of the microphone. The foam helps to dissipate the energy in the blast of air before the sound reaches the mic element.

- Note: the mic cover is designed for the Blue and Pro condenser microphone, package not included Blue...
- Function: the foam cover is made of high density foam, it helps improve recording quality by...
- Application: protect your Blue,microphone from dust and saliva, good for indoor and outdoor use
- Good choice for musical instruments, podcasting, voice-covers, interviews, field recordings,...
Last update on 2025-10-20 / Affiliate links / Images from Amazon Product Advertising API
Professional, that means more expensive, foam windshields can work well. But cheap ones are little more than spit guards that will help protect the microphone from moisture. Even so, they are probably worth getting just to keep your microphone safe.
Pop filters, those circular rings covered in nylon or metal mesh and mounted on a gooseneck, are much more effective at stopping pops in your recorded speech.
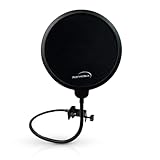
- Cleaner Audio: This pop filter for microphones helps produce pristine sound quality by filtering...
- Double-Mesh: With a dual-layer mesh screen, the microphone pop filter won't stifle sound or diminish...
- Adjustable Gooseneck: Mounted on a flexible and fully rotational arm. The microphone filter can...
- Easy Installation: Designed for stable and ultra-secure mounting. Adjustable clasp can fit on...
Last update on 2025-10-11 / Affiliate links / Images from Amazon Product Advertising API
I would recommend getting both a windshield and a pop filter. They’ll help clean up your speech, preventing those offensive pops and blasts that will ruin your recordings.
Reduce the background noise
The last thing you need to deal with is background noise. This includes aircon, fans, PCs, neighbors, lawnmowers, traffic, TVs, barking dogs, etc.
Those that you can turn off, do so. The other sounds, like traffic and people, might be less noticeable if you pick the correct time of day (or night). Moving to another room, or even a closet, might also help.
You probably don’t need to install lots of sound insolation if you use the Yeti correctly and keep it close to your mouth. You’ll be able to turn down the gain, to the point where you can be heard clearly but the background noises appear very faint.
The other background noise you want to avoid is the reverberations of your own voice. Again, getting close to the mic will help minimize those reverberations. But if they are a real problem, you can try damping those reflected sound waves by installing some foam panels or even hanging some blankets on the walls.
There’s usually a way to deal with background noise, so don’t despair if your first recording sounds poor. You can read my other articles that will help.
Conclusion: Is the Blue Yeti worth it?
The Blue Yeti is a good microphone, provided you set it up and use it correctly. Although it’s not a professional microphone, the audio is good enough to allow you to record quality audio for live streaming and podcasts. What’s more, with the right Apple USB adapter you can record straight into an iPhone or iPad with a Blue Yeti.
When you compare the Yeti to a professional studio mic, which will also require a preamp and USB sound interface, the Yeti looks like you’re getting value for money. You’ll pay at least 5 to 6 times the amount for a professional mic setup. You’ll also be able to use a wide range of recording software with the Yeti.
You may hear the difference in sound quality if you listen back on decent-quality studio monitors or professional headphones, but will your audience hear the difference? In most cases, I don’t think so.
You see. Most people will watch or listen to your streams either on a desktop computer or mobile device. In fact, over 70% of YouTube views![]() are now via YouTube’s mobile app. For most people, neither option comes with great speakers.
are now via YouTube’s mobile app. For most people, neither option comes with great speakers.
Most computer speakers produce poor-quality sound. I’ve even had clients complain about my properly mastered audio because, and I quote, “the sound makes the computer speaker buzz”. Come on, do you really expect a 3-inch speaker to reproduce good audio?
When you then consider mobile devices, the sound is even worse, although you can plug in headphones. But most people are not using expensive pro-quality headphones.
If playback sound quality is never going to do justice to the most expensive of professional microphones, is there any point in spending all that extra cash?
Now don’t get me wrong. I’m not suggesting you should record poor-quality audio because sound quality really matters. What I am saying is that there comes a point where spending lots of money won’t make any difference for most viewers and listeners. Simply put, good enough sound quality is good enough.
Now that brings me back to the Yeti. If you use it correctly, it has the potential to make you sound good online. It’s also a very robust microphone, with the body being made from aluminum. Furthermore, being a Plug’n’Play USB microphone you don’t need or have to learn, many audio engineering skills. Finally, for most viewers, the Yeti looks the part and won’t fail to impress.
So, is the Blue Yet worth it? Provided you don’t expect a professional microphone for a fraction of the price, I would definitely say, yes it is.
Tosh Lubek runs an audio and video production business in the UK and has been using the Canon EOS R since it was released in the Autumn of 2018 and the Canon EOS R6 in 2020. He has used both cameras to shoot TV commercials broadcast on Sky TV, promotional business videos, videos of events and functions, and YouTube creator content. He has also won several international awards for his advertising and promotional work. You can meet him by visiting his “video booth” at HashTag Business Events across the country.
Recent Posts
Most people use sandbags the wrong way. Here’s how to hang them properly on a light stand for maximum stability and safety — plus what to fill them with.
You're Using the Canon RF 50mm f/1.8 WRONG! Here’s How to Fix It
If you’ve recently picked up the Canon RF 50mm f/1.8 STM—affectionately known as the Nifty Fifty—you might be confused by that strange switch on the side of the lens. It doesn’t say AF/MF...