
DIY Video Studio is supported by its readers who use the affiliate links or ads on this site. As an Amazon Associate, I earn from qualifying purchases. Thank your support if you use any of the links.
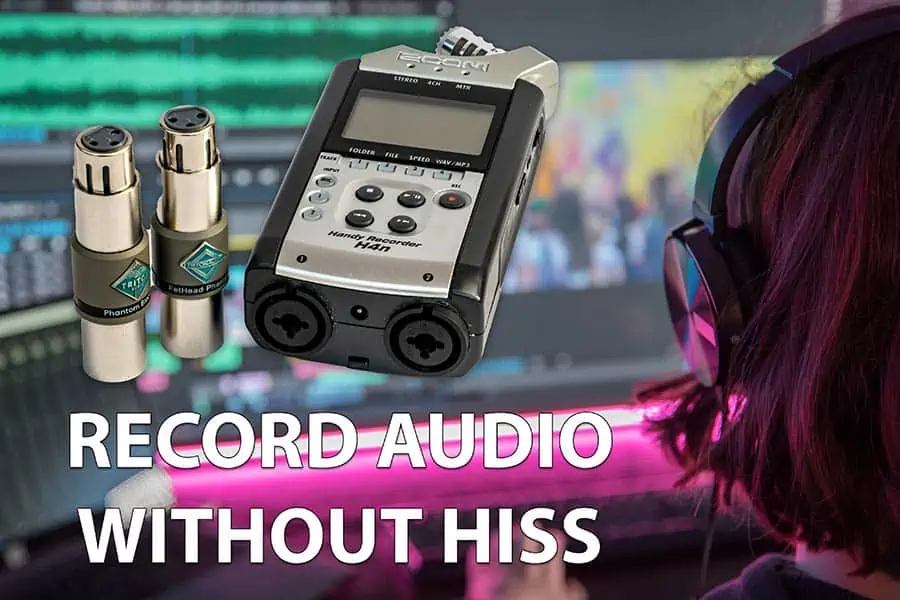
Do you want to record cleaner, hiss, and noise-free speech, vocals, and music on your Zoom H4n digital audio recorder?
In this article, I show how you can improve the performance of the Zoom H4n so you can make a better sound recording when using XLR microphones. However, the same details apply when recording to any digital audio recorder, camcorder, or audio interface that has XLR microphone inputs.
The basic approach is as follows.
To minimize the preamp self-noise in your recording, lower the Zoom H4n recording levels. To compensate for the reduced gain, increase the microphone signal by getting the mic closer to your subject, using a mic with a higher output, or by adding a low noise preamp to boost the microphone signal.
I will go through each of these solutions, but focusing on using a low noise preamplifier, because of its greater usefulness.
To make it easier to understand how to solve the problem, we need to know why Zoom H4n recordings can have a noise problem.
What causes the hissing in audio recordings?
The hissing you can hear in Zoom H4n recordings, sometimes referred to as static noise or white noise, has two main sources. The first is the microphone’s self-noise or the signal it produces even without a sound source. The second is the self-noise of the Zoom H4n’s preamps.
The self-noise of any microphone is fixed, so we can only control it by changing the microphone we use. Thankfully, there are plenty of microphones that have a low enough self-noise to make them acceptable, but for the best quality recordings, we need a microphone with a low self-noise.
Also, some microphones produce much lower outputs than others. When we use a “weak” microphone with the Zoom H4n recorder we will have to increase the recording level, if the audio is to peak at the correct level.
Now here’s the problem. As you increase the record level, any noise produced by the recorder’s preamps will also get louder, making the noise more noticeable as a background hiss.
What Zoom H4n gain settings to use to reduce background noise
To minimize the hissing sound, we need to keep the Zoom H4n recording levels as low as possible. They should be lower than 50, and ideally, less than 30.
But let me clarify what I mean by the Zoom recording level.
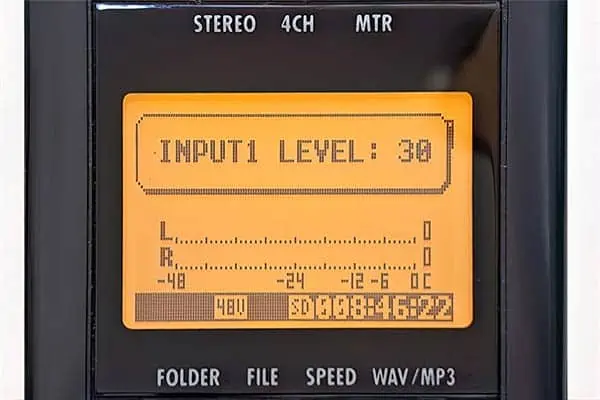
Here I mean the H4n gain settings and not the level of the audio you see on the audio meter. To change the recording level on the Zoom H4n press either the Input “1” or “2” buttons to select the input source to adjust. Then the level can be increased by pressing the REC LEVEL “+” button or reduced by pressing the “-” button.
Irrespective of how low, or high, we have adjusted the recording level, we still need to aim to have the audio peak at our normal meter level. For video work, this is often around -18dB or -12dB. The way to do this is to have a strong signal from the microphone.
How to increase the microphone signal
There are three basic ways we can get a high signal from the microphone, they are.
- Use a microphone that is designed to have a strong output.
- Get closer to the microphone, so the speech seems louder to the microphone.
- Use a high-quality microphone preamp between the mic and the recorder input.
The trouble with the first solution is that if we already have a good microphone that unfortunately has a low output signal, we probably don’t want to spend more money buying another microphone. For example, I have a Beyer Dynamic M69 microphone that has an output level of 2.4mV/Pa. Although the output is low, I like recordings of my voice made with this dynamic mic.
But if we haven’t bought a microphone yet, but do have a Zoom H4n for the recording, we might want to get a microphone that delivers a strong signal.
The second solution is only possible if we don’t mind having the microphone in shot. If we’re recording a voiceover, we can get very close to the microphone. But if we’re shooting a video and recording the sound with a shotgun mic on a boom arm, we probably will want to keep the mic just out of shot. That means the microphone won’t get any closer than 1½ to 2 ft.
The third solution is usually the best. It gives us maximum control and doesn’t impact the way we work.
By including a high-quality microphone preamp between the microphone and recorder we can boost the microphone signal significantly, without adding noise and therefore avoiding background hiss in our recordings.
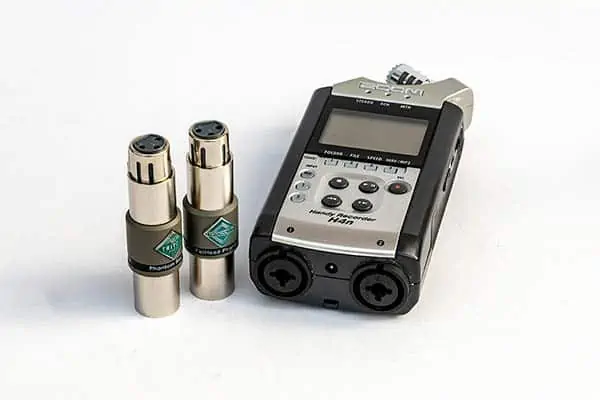
Boosting the signal with Triton Audio inline microphone preamps
To boost the signal from a microphone we can use an inline microphone preamp, like those from Triton Audio.
They have two models of interest to videographers and most content creators, they are the FetHead and FeatHead Phantom, which are compact and moderately priced. For those who crave the rich larger-than-life sound of high-priced vintage gear, there’s the FetHead Germanium.
The FetHead is designed for Dynamic and Ribbon microphones, providing a signal boost of 27dB. For Condenser microphones, there’s the FetHead Phanton, which will pass phantom power to the microphone and boost the mic signal by 18dB without adding noise.
Videographers or filmmakers who use shotgun or other XLR microphones will probably choose the FetHead Phantom. While podcasters and voiceover artists who prefer dynamic mics normally choose the FetHead for the extra signal boost.
Please note, that it is not recommended to use the FetHead Phantom with ribbon microphones or other mics that cannot tolerate phantom power unless the phantom power is blocked. Triton Audio also makes the Phantom Blocker for that purpose. Although most modern microphones with XLR plugs can tolerate 48 Volt phantom power, do make sure before supplying phantom power to your dynamic or ribbon mics.
Here’s a rundown of the two Triton Audio mic preamps and their phantom blocker. They all look very similar but are designed to do different jobs.
Triton Audio FetHead
- Ultra-low noise preamp for ribbon and dynamic microphones.
- Up to 27dB of clean boost.
- Lowers the noise floor of your recordings.
- Uses 24-48V phantom power but doesn’t pass it to the microphone.
- Balanced XLR input/output.
- Frequency response 10hz-100khz (+/- 1dB)

- Low-Noise Class-A JEFT Amplifier
- Double Single-Ended Amplifier Topology
- Shielded Enclosure
- 4 Matched JFETs
Last update on 2025-10-20 / Affiliate links / Images from Amazon Product Advertising API
Triton Audio FetHead Phantom
- Ultra-low noise preamp for condenser microphones.
- Great for mobile recording and camera microphones.
- Up to 18dB of clean boost.
- Lowers the noise floor of your recordings.
- Uses 24-48V phantom power and allows it to reach the microphone.
- Balanced XLR input/output.
- Frequency response 30hz-100khz (+/- 1dB).

- FET-style In-line Microphone Preamplifier
Last update on 2025-10-20 / Affiliate links / Images from Amazon Product Advertising API
Triton Audio Phantom Blocker
- Blocks phantom power while letting the audio signal pass through intact.
- Protects microphones (mainly ribbon mics).
- Protects device outputs etc.
- Balanced XLR input/output.

- Protects Vintage Equipment
- Prevents Short Circuits
- Protects Computer Interfaces
- Signal Passes Unaffected
Last update on 2025-10-20 / Affiliate links / Images from Amazon Product Advertising API
How to use the Triton Audio FetHead and FetHead Phantom
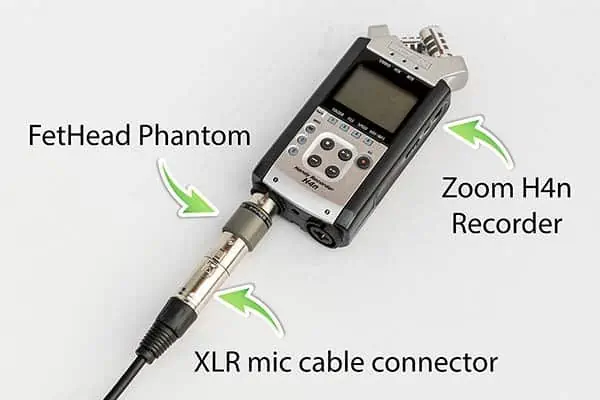
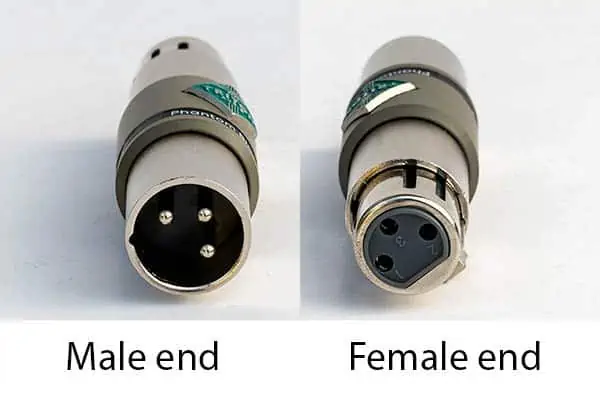
The Triton Audio inline microphone preamps are simple to use. They have a male XLR connector at one end and a female XLR connector at the other. Plug the male end into one of the input sockets on the Zoom H4n, then plug the microphone cable into the female end of the preamp. Finally, plug the other end of the cable into the XLR microphone.
There are no user controls or dials on the body of the FetHead or FetHead Phantom. The microphone signal will be boosted by an amount that depends on which version is used. The clean boost is about 27dB with the FetHead, and 18dB with the FetHead Phantom.
Once in the circuit, the inline preamps will significantly increase the microphone signal. With some high output condenser microphones, the Zoom record level may need to be reduced to close to the minimum value.
If you are unsure which is the male or female end of the FetHead, FetHead Phantom, or Phantom Blocker, here is an image that shows the difference.
The difference a FetHead Phantom makes to the H4n noise floor
I tested the FetHead Phantom since this is the model most video makers will opt for. If you are a gamer, streamer, or podcaster who used a dynamic mic, especially the low output Shure SM7B, you will want the Triton Audio FetHead. However, it is possible to use the FetHead Phantom with a dynamic microphone.
I did the tests using two microphones, to check what difference the Triton FetHead Phantom makes to the signal level, and how it affects the practical noise floor of the recordings on the Zoom H4n.
The microphones I used in the tests were the Sennheiser ME66 and Beyer Dynamic M69N. I recorded my tests in my voice booth with acoustic foam on the walls and ceiling, so there was no significant reverberation, and it was reasonably quiet.
I mounted a circular mesh pop filter in front of the microphones and spoke from just behind it. This ensured I was always speaking 10 inches from the microphone. After speaking I recorded 10sec of silence, or more correctly, the ambient sound in the voice booth.
Each recording was done with and without the FetHead Phantom in the circuit.
I expect the results to be approximate since the level of my speech cannot be identical in every take. Also, the display on the Zoom H4n is only 43mm wide, making it difficult to judge whether my voice was peaking at -18dB.
Test 1: Real-world signal gain with the FetHead Phantom
First, I recorded with the Sennheiser ME66 shotgun microphone, but without the FetHead Phantom inline preamp. The Zoom H4n record level was adjusted set to “5” so that my speech peaked at about -18dB on the audio meter.
I then recorded with the FetHead Phantom in the circuit, having left the record level at “5”. I have included a screen show of the waveform with and without the
FetHead Phantom. As you can see, the preamp has made a significant difference to the microphone signal. But the section of ambient sound, where I remained silent, looks pretty much unchanged, at least visually.
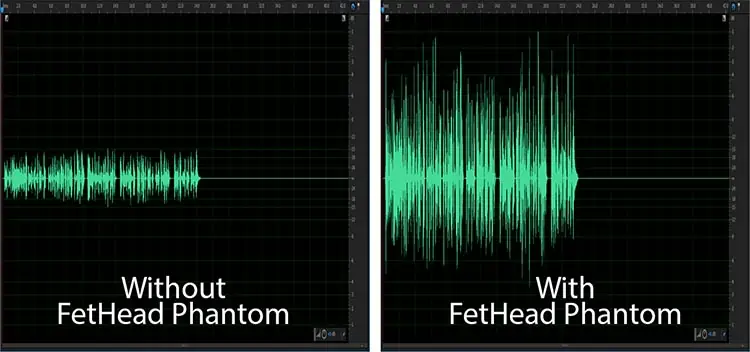
Without the FetHead Phantom the recording peaks at about -18dB. But with the FetHead Phantom preamp, some peaks are reaching about -1dB. So, we are getting a signal boost of about 18dB, which is what Triton Audio claims for the FetHead Phantom.
Using the Amplitude Statistics tool in Adobe Audition, I measured the loudness of the two files. Without the FetHead Phantom, the loudness was -35.92 LUFS. With the FetHead Phantom, the loudness was -19.80 LUFS. That’s a difference of -16.13 LUFS.
So, by adding the FetHead Phantom there is a significant increase in gain. If instead, I had used the FetHead for this test, the audio from the Sennheiser ME66 would have been clipped, since the FetHead boosts the signal by 27dB.
Test 2: How does the noise floor improve with the FetHead Phantom
In this test, whether the FetHead Phantom was used or not, I adjusted the input gain on the Zoom H4n so that the audio peaked at about -18dB on the audio meter. I then normalized the recorded audio to -23 LUFS, as if I were making a TV spot for broadcast.
Note I could have chosen to normalize the audio as if it were for a podcast (-16 LUFS), or a YouTube video (about -14 LUFS). However, what we are looking for is a difference in the level of the “silence” in the two recordings. This will tell us whether it is worth using the inline preamp. I have included a screenshot of the waveforms below.
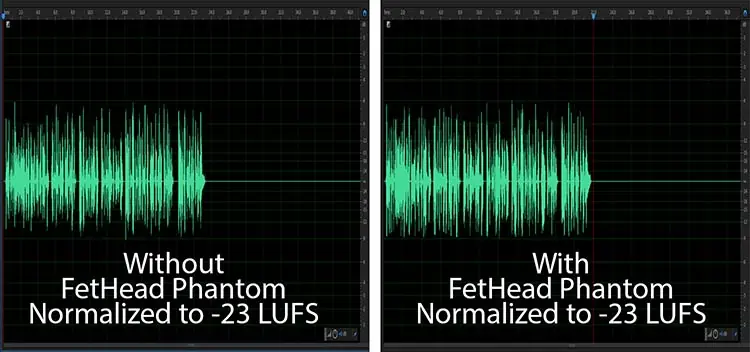
Unsurprisingly, the two waveforms appear to be similar since both recordings peaked at about -18dB and were then normalized to the same value of -23 LUFS.
However, the difference becomes apparent if we measure the practical noise floor or, more correctly, the practical noise floor. The “silent” part of the recordings, after I stop speaking, isn’t just silence. It is a mixture of the H4n preamp’s self-noise, the microphone’s self-noise, sounds that leaked into the voice booth, and noises from me. To judge the practical noise floor, I selected a section of that ambient silence and analyzed it in Adobe Audition’s Amplitude Statistics tool. What we’re looking for is the Average RMS Amplitude value, as you can see below.
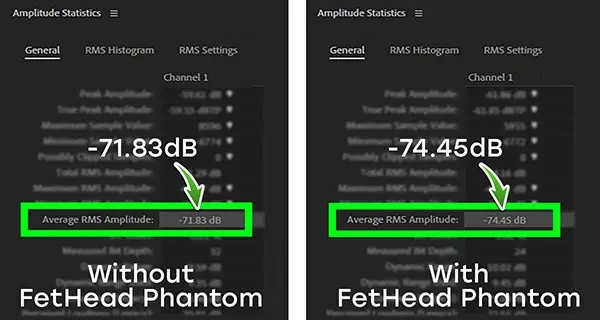
Without the FetHead the practical noise floor is -71.83dB, but with the FetHead Phantom in the circuit, the practical noise floor is -74.45dB. That’s a difference of 2.62dB. Although that 2.62dB doesn’t sound like a lot, it is a significant improvement since the microphone has a high signal output.
In a sense, by using the Sennheiser ME66 I’m kind of cheating a little. With a high sensitivity of 50mV/Pa, I was able to turn down the input gain much further and get the best possible performance out of the preamps on the Zoom H4n recorder, even before adding the FetHead Phantom.
To peak at -18dB without the FetHead Phantom I had the H4n’s record level set to 9 out of 100 (on one take it was even 5 out of 100). But after adding the FetHead Phantom, the record level needed to drop to just 0.7 out of 100, which was a surprise. The H4n manual says that the record level on inputs 1 and 2 (the XLR inputs) can be adjusted from 1 to 100. Perhaps a firmware update included tenths of a division from 0 to 1 for the Record Level.
Test 3: Using a Dynamic microphone with the FetHead Phantom
So, what happens when you record with a dynamic microphone, which has a low output than a condenser mic and therefore requires a higher recording level on a Zoom H4n recorder?
The dynamic microphone I’m using for the test is a Beyer Dynamic M69N. It has a sensitivity of 2.4mV/Pa, so that’s less than 5% of the sensitivity of the Sennheiser ME66. That’s ideal since I will have to crank up the recording level on the H4n recorder in order to get my speech to peak at -18dB. Again, I did two test recordings, with and without the FetHead Phantom, adjusting the recording level each time so the speech peaked at -18dB. The files were then normalized, to -23 LUFS (the target loudness for European TV) and to -14 LUFS (the target loudness for YouTube). The waveforms are shown below.
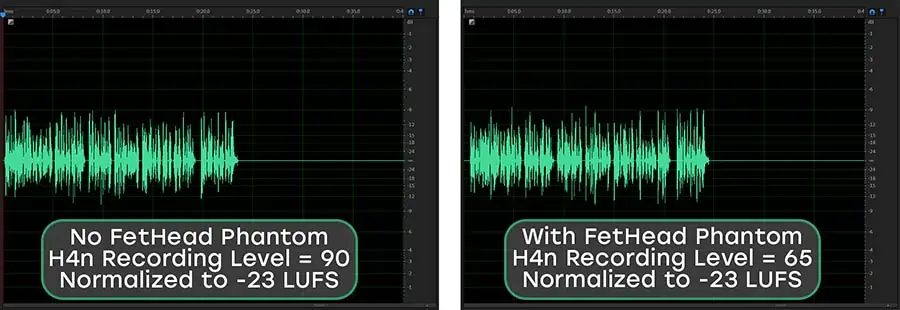
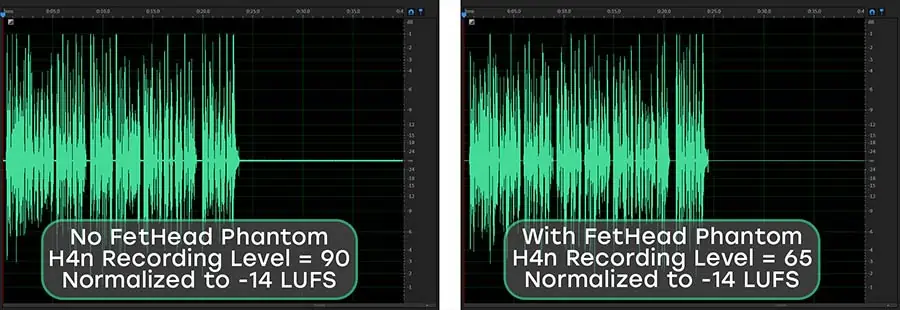
Although it’s difficult to see in these images, the noise in the “silent” sections is higher in the files recorded without the FetHead Phantom, because the H4n record level needed to be increased to 90 out of a maximum of 100. If you look at the pair of images where the audio has been normalized to -14 LUFS (for YouTube), you can see the line representing the silence appears a little thicker because the noise level is higher.
I measured the Average RMS Amplitude of the “silence” to get the Zoom H4n practical noise floor in each file. The results were as follows.
| No FHP Recording level of 90 | With FHP Recording level of 65 | Noise floor difference with and without FHP | |
|---|---|---|---|
| Normalized to -14 LUFS | -56.25dB | -65.36dB | 10.45dB |
| Normalized to -23 LUFS | -65.36dB | -76.33dB | 10.97dB |
When recording into a Zoom H4n with a dynamic microphone we see a big difference in the practical noise floor when using a FetHead Phantom and then not. This makes a big difference to the quality of the audio.
Without the inline preamp, there is obvious background hiss on the audio normalized for YouTube (-14 LUFS) and European Broadcast TV (-23 LUFS).
In the recording where the FetHead Phantom was used, the audio normalized to -23 LUFS did not have any hint of noise, while the file normalized to -14 LUFS had a slight hint of noise, but nothing that would be noticed on YouTube.
Even though the FetHead Phantom is intended for condenser and not dynamic microphones, it still manages to do a good job of improving the audio quality from a dynamic mic. However, the Triton Audio FetHead would have done a much better job because it is designed to be used with dynamic microphones and provides a 27dB clean boost. That’s 50% more gain than the FetHead Phantom.
Conclusion
If you have a Zoom H4n digital audio recorder and use XLR microphones, getting a Triton Audio FetHead and/or a FetHead Phantom is a no-brainer. These inline microphone preamps are neutral sounding, not expensive, and can transform your recording from unusable to great quality. However, don’t imagine they can only be used with the H4n. Triton Audio’s mic preamps can be used with any recorder, camcorder, audio interface, or mixer. The only proviso is that it should have XLR inputs.
If you’re interested in these, they are available on Amazon using the following links.
Last update on 2025-10-20 / Affiliate links / Images from Amazon Product Advertising API
Sources: XLR Connector![]() , Triton Audio Products
, Triton Audio Products![]()
Tosh Lubek runs an audio and video production business in the UK and has been using the Canon EOS R since it was released in the Autumn of 2018 and the Canon EOS R6 in 2020. He has used both cameras to shoot TV commercials broadcast on Sky TV, promotional business videos, videos of events and functions, and YouTube creator content. He has also won several international awards for his advertising and promotional work. You can meet him by visiting his “video booth” at HashTag Business Events across the country.
Recent Posts
Most people use sandbags the wrong way. Here’s how to hang them properly on a light stand for maximum stability and safety — plus what to fill them with.
You're Using the Canon RF 50mm f/1.8 WRONG! Here’s How to Fix It
If you’ve recently picked up the Canon RF 50mm f/1.8 STM—affectionately known as the Nifty Fifty—you might be confused by that strange switch on the side of the lens. It doesn’t say AF/MF...