

DIY Video Studio is supported by its readers who use the affiliate links or ads on this site. As an Amazon Associate, I earn from qualifying purchases. Thank your support if you use any of the links.
We all know about using Zoom for virtual meetings but can also be used by students for online classes, and virtual music lessons.
However, Zoom’s default audio settings are optimized for remote working or an office environment and not for music and singing. The default settings assume you are in a typical office, so the app tries to cut what it thinks is background noise. The settings also allow Zoom to minimize the amount of work your CPU must do and reduces the need for a lot of network bandwidth. By using the default settings everyone will have a good user experience on Zoom.
The trouble is that these general settings are not ideal for virtual music lessons, where the teacher needs to hear the student clearly.
Zoom’s default settings also make live performances sound quite poor and not the rich experience they should be where you should be able to hear every detail. This also applies to songwriters working together, as well as those leading dance, fitness & yoga classes.
One of the immediately apparent problems with the default settings is that Zoom tries to remove background noises. But this can make your music or vocals quite choppy and the sound cuts in and out.
If you need clear sound, high-fidelity, and no choppiness, you can still use Zoom, you just need to make a few changes to your audio settings. This is because Zoom has been upgrading its algorithms and has added High Fidelity Music Mode, which is easy to use and makes the quality of sound for Zoom much better.
So how do you improve the sound for Zoom? Here’s the quick overview answer.
To optimize your sound for Zoom music performance use these settings:
- Go to Settings then Audio
- In the Microphone section uncheck “Automatically adjust microphone volume”
- Under Music and Professional Audio check
- Also, for a good connection, select ‘High fidelity music mode.’
These are the bare bones of how to improve your Zoom audio. But in this article, I also look at…
- The details of improving your sound quality, with step-by-step instructions and screen shots.
- Suggest how to further improve your sound.
- Explain how to access your audio settings during a live Zoom Meeting.
- Answer what you can do to stop your sound being distorted.
- And show how to share high quality audio files during a Zoom Meeting.
Changing settings for the Best Sound for Zoom for Music or Vocals
Although the default settings in Zoom might be great for a conference call, that’s not the case when streaming music or vocals. The app requires a bit of tuning to get the audio sounding good. But don’t worry, this is going to be easy to do.
Update the zoom client or app to access the latest audio features
Before you start adjusting the settings, the first thing you should do is confirm that you have the latest version of the desktop app. Earlier versions of the desktop client do not have the audio settings you’ll need.
If you don’t already have the Zoom app, download the latest version from the Zoom Download Center![]() .
.
The page has download links for the Zoom Client for Meetings for desktops, the iOS and Android Zoom Mobile Apps, as well as other Zoom downloads.
If you already have Zoom installed on your desktop/laptop computer, check that you have the latest version of the Zoom desktop client and update it, if necessary, by doing the following steps.
Step 1

Launch the Zoom desktop client, and if necessary, log in. Then click your account icon in the top right of the window.
Step 2
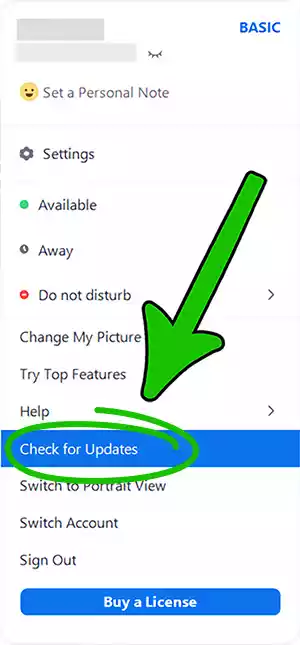
Check for Updates. In the menu window that has opened click on Check for Updates.
Step 3
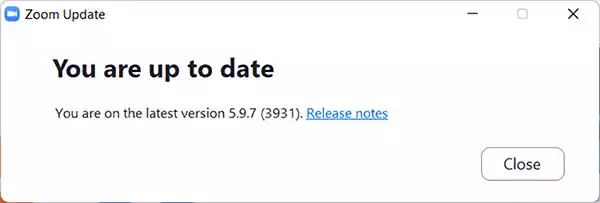
If you have the latest Zoom desktop client you will see a message that You are up to date, and you can close the message. If you need to update your client follow the on-screen instructions.
Changing your Zoom Audio Settings for good music sound
Now that you have the latest version of the Zoom desktop client you can go ahead and change the audio settings to improve the sound in Zoom. This is how to do it:
Step 1
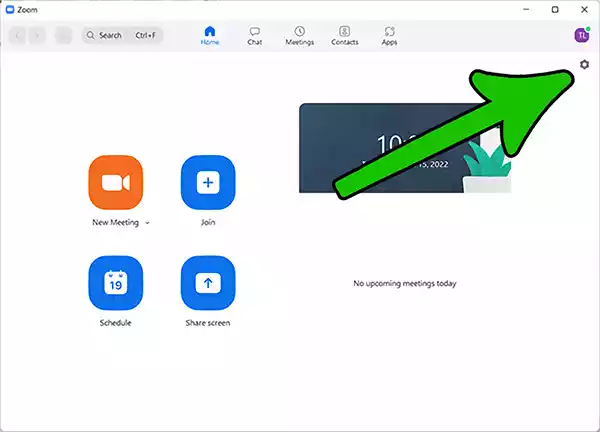
With the Zoom desktop client open, click on the gearwheel settings icon which is below your profile picture or account icon.
Step 2
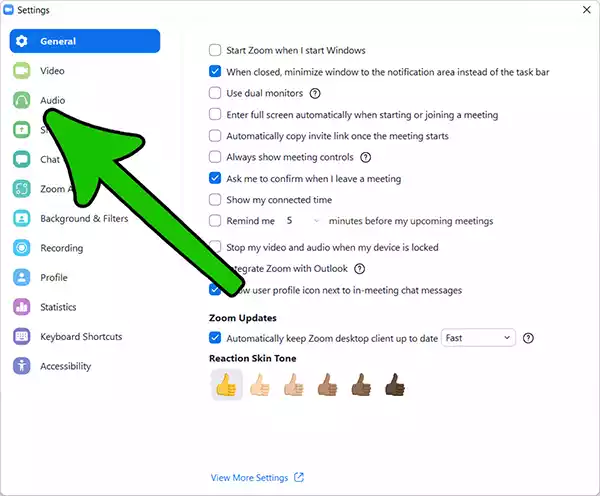
In the settings window that opens you will initially see the General settings, however, you need to access the Audio settings. Click on the Audio/headphone icon that should be the third item in the list of options on the left of the window.
Step 3
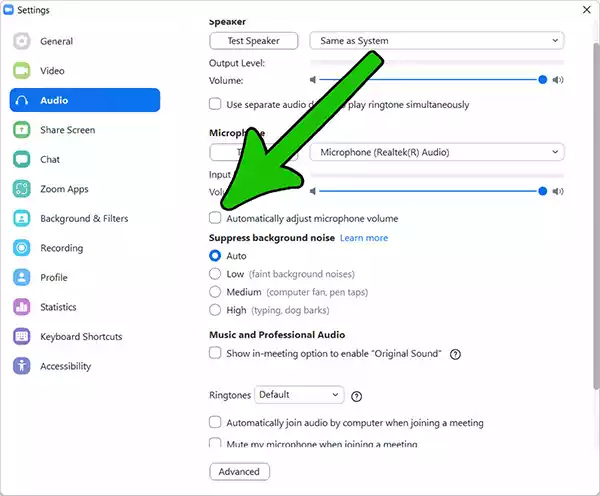
With the Audio settings window open, uncheck Automatically adjust microphone volume. This will allow you to manually adjust your microphone level by adjusting the volume slider. If you are using an external microphone with an audio interface, you will also be able to adjust the microphone volume by using the mic level dial on the audio interface.
You can leave the settings in the Suppress background noise section set to Auto since the next step has the same effect, but also give you extra options.
Step 4
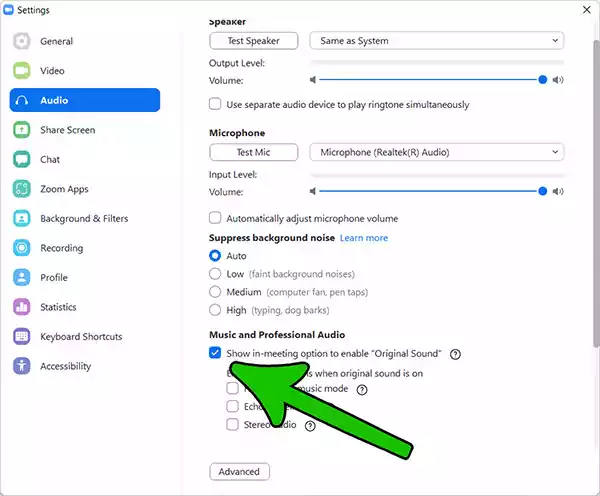
Under the Music and Professional Audio section click and check the box next to Show in-meeting option to enable “Original Sound”.
This option automatically disables zoom noise suppression, removes high pass filtering, and removes automatic gain control. It is recommended for playing music and for performances in studio-like environments. In these situations, it is likely you will be using better quality microphones than those built into your device, and possibly along with better speakers and an audio interface. It is not recommended for use in noisy environments or for general meetings.
This one change of enabling original sound will significantly enhance your audio stream, removing the choppiness that is often a feature of audio on Zoom.
Step 5
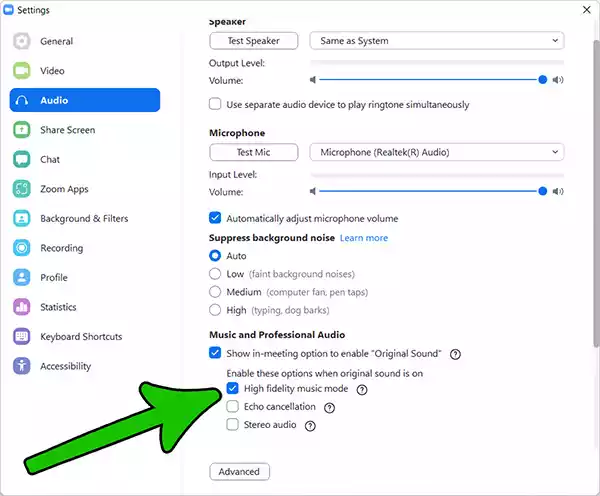
Click and check the box beside High-fidelity music mode. This will provide professional-grade audio from your Zoom client and enable the streaming of rich, professional-grade sound to one or more people.
However, there is a reason why the Zoom client does not have High-fidelity music mode enabled by default.
The audio sampling and data bitrate are both much higher when High-fidelity music mode is enabled. This will increase the utilization of your computer’s CPU and more network bandwidth will be used.
Because of the extra amount of data being sent, Zoom recommends using a wired network connection (Ethernet connection) instead of WiFi. You’ll also need a fast and stable internet connection. A speed of about 20-30MBPS or better would be ideal.
If you need to use a WiFi connection, get close to your router or WiFi hub, this will improve your connection and speed. You could also try switching between the 2.4GHz and 5GHz connection bands and test which one works best for you. In theory, 2.4 GHz provides a slower speed connection but with a longer range. However, 5 GHz should provide a faster connection but with a shorter range.
Step 6
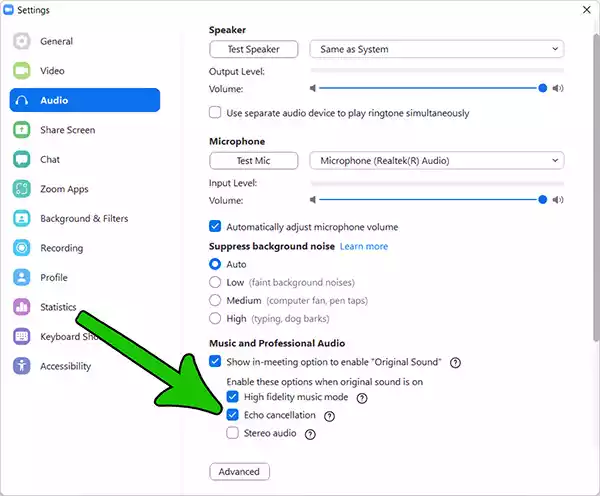
Enable Echo Cancellation (optional). Click and check the box beside Echo cancellation.
This option automatically prevents echoes from being captured or created, thereby improving the audio quality.
Echo cancellation in the context of Zoom does not refer to the echo, or reverberation, that you get in a room, but rather the echo where you hear yourself coming back after being picked up by the other person’s microphone from their speakers.
The use of headphones during Zoom music tuition or by those leading dance, fitness & yoga classes is recommended. Bluetooth headphones, or earbuds, will be the better option since they provide maximum freedom of movement.
More generally, when you hear an echo effect on Zoom it’s because a device is sending back the audio from the other person, or people. So, they may need to also look at their settings and/or also wear headphones.
I have helped a young lady set up Zoom on her PC for violin tuition. To simplify things, she uses a headset that has both headphones and a microphone. This avoids the problem of echoes.
Step 7
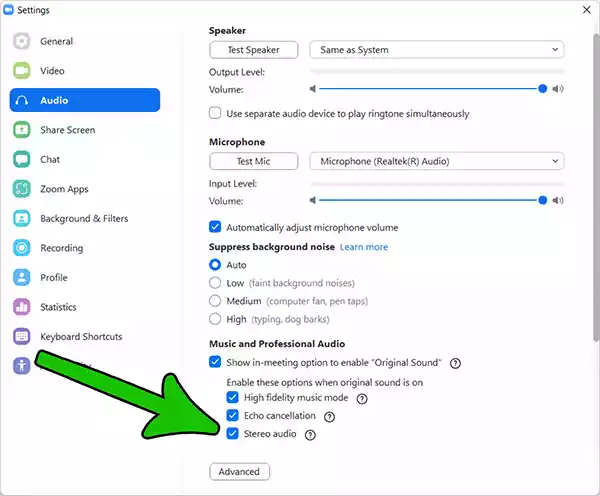
Enable Stereo Audio (optional). If you need to send stereo audio click and check the box beside Stereo audio.
By checking this box Zoom will encode the audio in stereo. Unless you need the audio stream to be in stereo or have a stereo capable microphone, it is not worth using this option. Stereo audio doubles the amount of data that needs to be processed and sent over your network. Therefore, your computer’s CPU utilization will be greater, and you will use more network bandwidth.
A very popular microphone for streaming is the Blue Yeti. If you are using this microphone and want to stream in stereo remember to change the mode on the microphone to stereo.
Although you are finished in your audio settings there is one more step to take before you are ready to send clear sound for your music sessions.
Step 8
Start a new Zoom Meeting and turn On Original Sound.
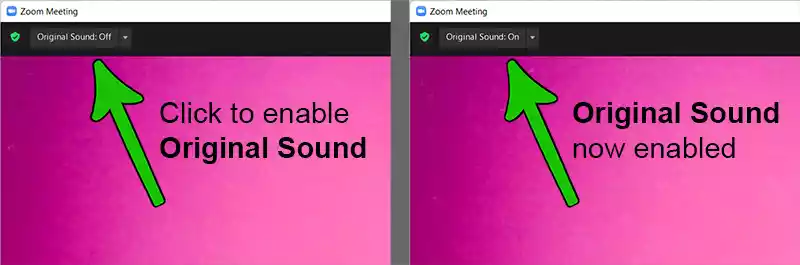
Now that you have turned on Original Sound you can proceed with your high-quality audio stream.
Setting up audio for music on the Zoom mobile app
If you are using the Zoom mobile app you will not have the same level of control over the audio settings as in the desktop client. Even so, the mobile audio settings screen does include an option that will help improve music streaming.
On the mobile app you can enable or disable Use Original Audio in a meeting. By enabling Use Original Sound on the Zoom mobile app, noise suppression will be disabled. This will prevent the audio from sounding choppy and improve the experience of you or your student streaming music or vocals over a mobile device, such as an iPad or smartphone.
So how do you disable noise suppression on your mobile device?
Step 1
Open the Zoom app on your mobile device.
Step 2
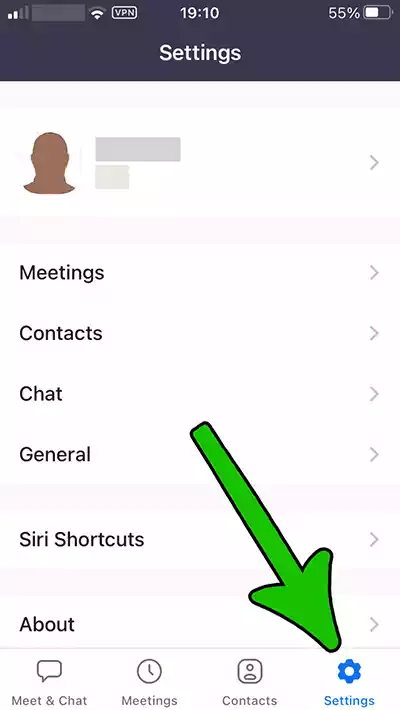
Tap on the gearwheel Settings icon in the bottom right of the screen.
Step 3
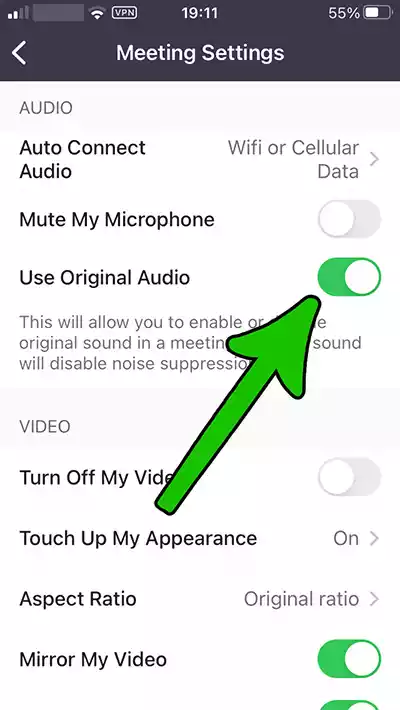
In the Audio settings, slide across the button to enable Use Original Audio.
Additional ways to improve your music sound for Zoom
You’ve no doubt heard the phrase, Rubbish in, Rubbish out. Well, it also applies to sending audio over Zoom for lessons, dance or fitness classes, and music or singing performances. No matter how you set up Zoom, if you do not input good quality audio then you’ll never get good quality audio out.
You need to ensure that your equipment is equal to the challenge. So, if you need to send the highest quality audio you can forget about using the internal microphone on your device, whether it’s a laptop or iPhone.
There are three issues about using the internal microphone on your device.
- It is a cheap component and not of the highest quality.
- It is intended for general use, and most likely unsuitable for recording music or vocals.
- The location is not ideal. To record good quality audio for music or vocals the microphone must be placed in the correct position.
You can overcome all these issues by purchasing good quality hardware, such as a good external microphone. It can be a USB microphone or a professional XLR microphone, although with the latter you will also need an audio interface.
If you want to keep things simple, I advise getting a good USB microphone. However, if you want more control and flexibility, look at getting a professional XLR microphone along with an audio interface. But if you take the second route, be away that it’s a more complex way of getting audio into your computer and the cost is higher.
For more information on this topic, you should find my following related articles of interest.
- Best USB Mic for Recording Singing, Music and Podcasts
- Audio Interface vs USB Mic: Do you need an audio interface with a USB mic?
- USB mic vs 3.5mm vs XLR – Which is Best for Zoom calls and streaming
- Where Does Zoom Save Recordings on my PC and Mobile Device?
- Blue Yeti microphone instructions: How to position your mic
- How to setup and use a Blue Yeti microphone
Now, even if you use professional hardware along with your desktop or laptop computer, there’s a chance that your audio might sound distorted. I’ll look at that situation next.
How to share high quality sound files in a Zoom Meeting?
During an online music lesson, collaboration or even a band or choir practice, you may want to share audio files with others on the Zoom Meeting. This can be done using the Share Screen button and choosing to share the audio in the next window. But if you want participants to hear the audio playing on your computer in high-fidelity, you’ll need to use the advanced settings.
There are two ways to do this. I’ll cover the quick way first, then give an alternative method.
Note: When you share your computer audio using either of these methods, you do so without sharing your screen.
Method 1
Step 1
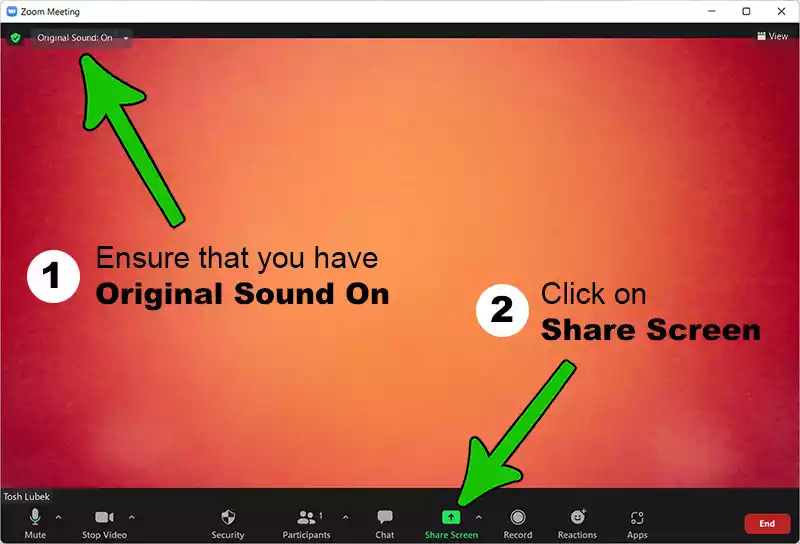
Ensure you have Original Sound On, if not click the button to toggle it on. Then click the green Share Screen icon on the bottom menu to open the sharing window.
Step 2
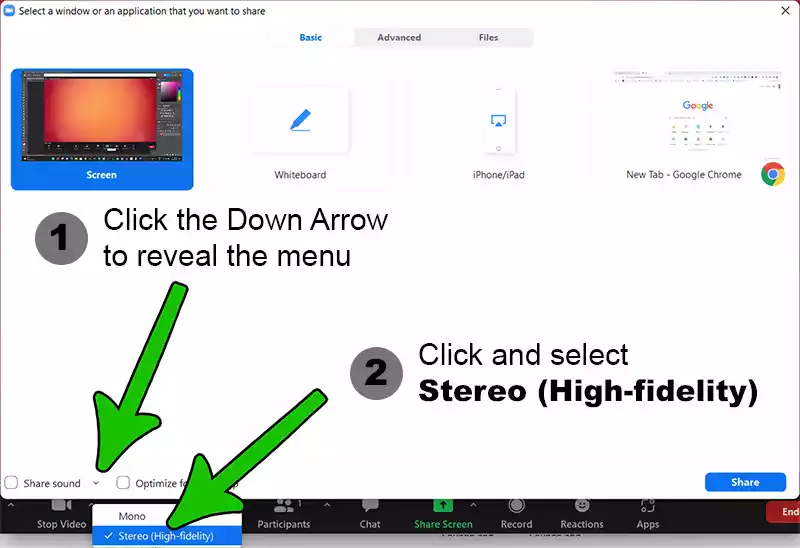
Click the down arrow beside the Share sound button to reveal the menu. Then select Stereo (High-fidelity) so it becomes checked.
Step 3
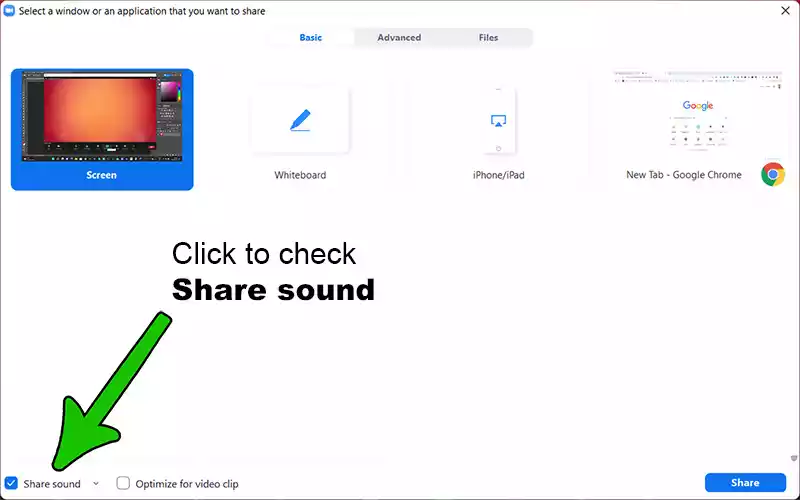
Now click the Share sound button.
Step 4
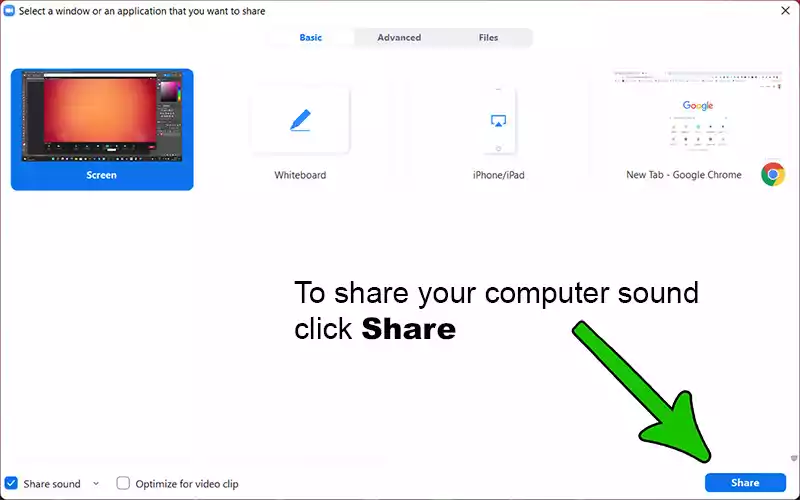
Now click the blue Share button in the bottom right corner of the window.
Now when you play an audio file on your computer, the other people on the Zoom Meeting will hear it in high-fidelity.
Step 5
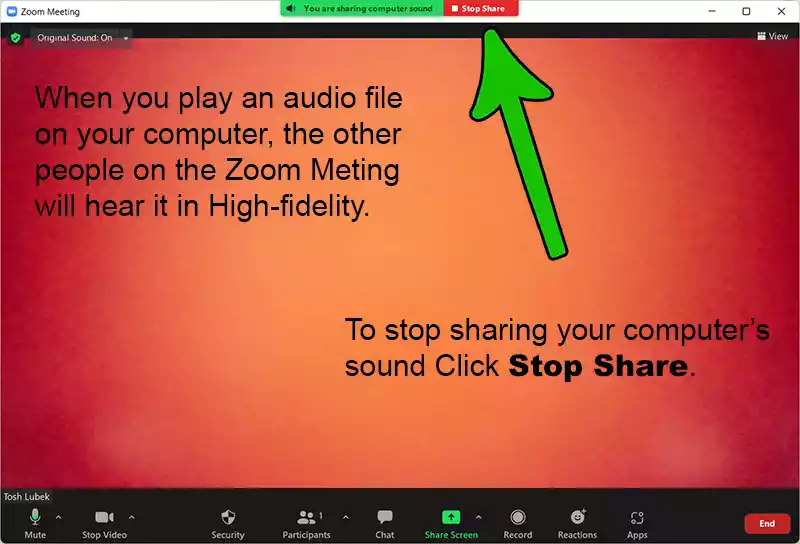
Once you have finished playing the audio/music for the other participants to hear click the red Stop Share button at the top of the Zoom client window.
WARNING: Because you are sharing a stereo audio file in high-fidelity, this will increase CPU utilization and the network bandwidth used. Remember that stereo audio will require twice the bandwidth of mono files.
Method 2
This is the alternative method for sharing your computer audio in high-fidelity.
Step 1
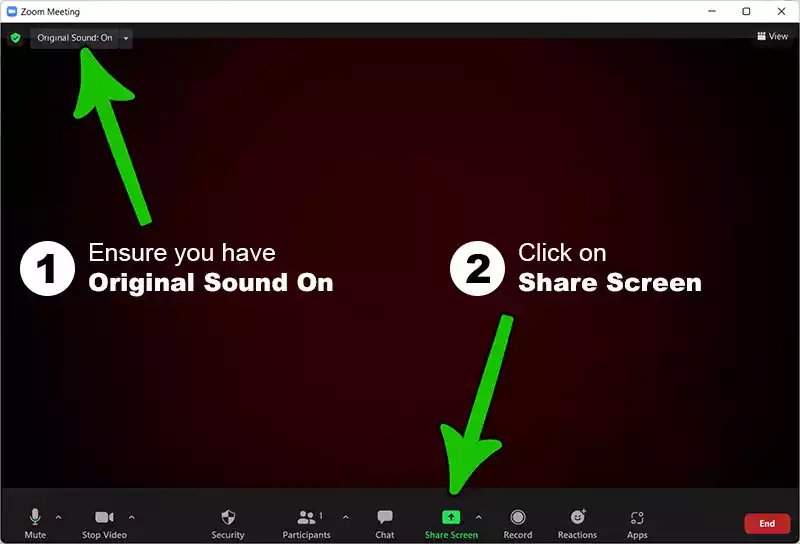
Ensure you have Original Sound On, if not click the button to toggle it on. Then click the green Share Screen icon on the bottom menu to open the sharing window.
Step 2
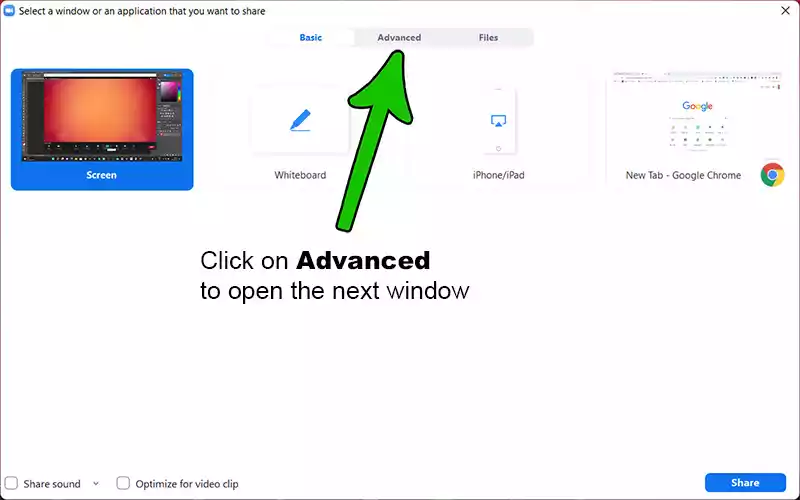
Click Advanced in the middle and top of the window.
Step 3
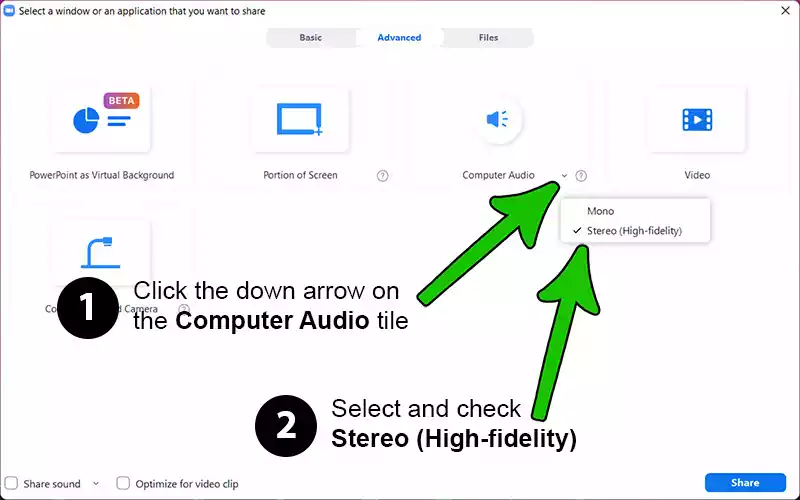
At the bottom of the Computer Audio tile click the down arrow to reveal the menu. You have two choices, choose Stereo (High-fidelity) by clicking on it.
Step 4
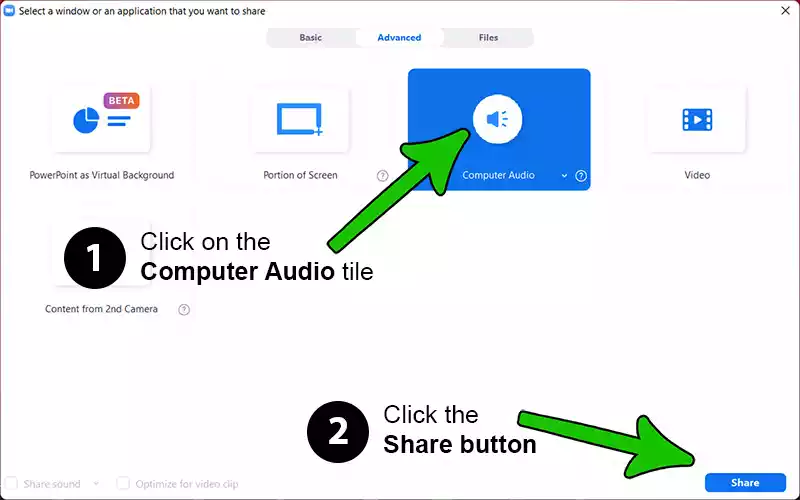
Click the Computer Audio tile and finally click the Share button. Any audio files you play on your computer will now be shared with the other Zoom Meeting participants in High-fidelity Stereo.
When you play an audio file on your computer, the other participants on the Zoom Meeting will hear it in high-fidelity.
Step 5
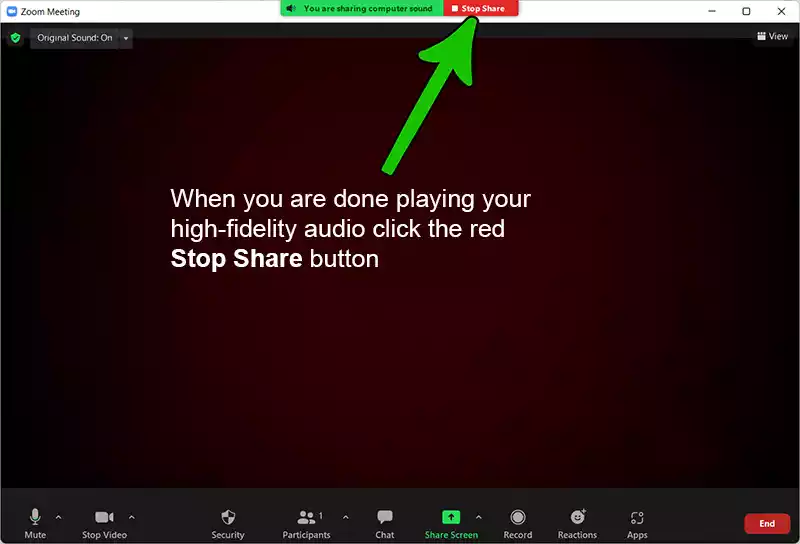
Once you have finished playing the audio/music for the other participants to hear click the red Stop Share button at the top of the Zoom client window.
WARNING: Because you are sharing a stereo audio file in high-fidelity, this will increase CPU utilization and the network bandwidth used. Remember that stereo audio will require twice the bandwidth of mono files.
Can I access audio settings during a Zoom Meeting?
Even when you are live in a Zoom Meeting you can access and change your audio (and video) settings.
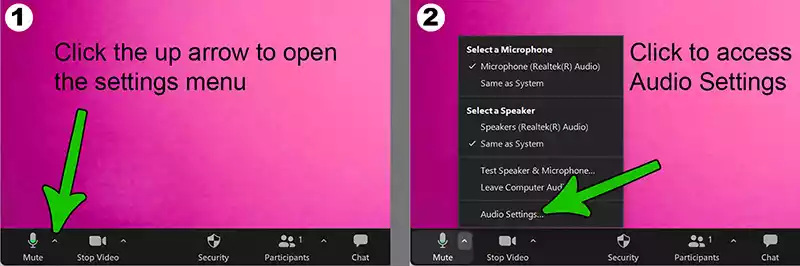
To change your audio settings:
Step 1: Click the up arrow to the right of the microphone icon.
Step 2: Choose Audio Settings… from the menu that opens.
Step 3: In the Audio Settings screen change the settings as you require.
My Zoom music sounds distorted, what’s wrong?
Music distortion is not something that is common when using Zoom, but it can be frustrating when it happens. With this problem, it’s extremely difficult to make out what the other person is saying, let alone enjoy the music coming through.
A number of things could cause music distortion in Zoom, and the common ones are:
- Bugs in the app – If you’ve started to experience this problem after installing the updates, the problem could be caused by a bug in the updates. This problem is beyond your control, even if you’ve made the settings to improve audio for Zoom, as discussed in this article.
- Computer sound settings – Improper sound settings in your computer could be causing the problem.
- Damaged speakers – Besides software problems, the issue could be caused by the computer’s hardware.
- Poor internet connection – Have you tried checking if your internet is stable lately? How about from the other end? This could be the cause.
How to Fix Music Distortion on Zoom
If the distortion started after you installed the latest Zoom update, that might be the problem. Try uninstalling the update and rolling back to an earlier version of Zoom. You can do this by uninstalling the entire app and downloading the previous package from the official zoom website.
You can also check the computer sound settings. Adjust them to try and eliminate the distortion. Usually, an input level that is too high will overload the audio circuits and lead to a distorted sound.
If you are using a microphone with a 3.5mm jack, check that you have plugged it into the correct socket. Many desktop computers have mic and line-in sockets, make sure you use the one for microphones. Another easily made mistake is to plug the mic jack and headphone jack into the wrong sockets. If you do this your headphones will behave as a microphone, but a very poor quality one. So, check that you’ve got your mic and headphones plugged the correct way round.
Talking of headphones, you can use them to check whether your computer speakers are the cause of the distorted sound. If when you plug in your headphones the sound is undistorted, it’s probably your speakers that are at fault and will need replaced.
If this doesn’t work, take your computer to a technician for an overall checkup since the problem could be the damaged speakers. If the internet speed is the problem, talk to your internet service provider to help improve the speed.
Finally, your internet connection could be the source of your trouble, although the audio won’t sound distorted, as in an overloaded audio signal. Even so, it won’t sound good. Try connecting to your router with a network cable rather than WiFi to see if a poor WiFi connection is the problem.
Final Thoughts
Zoom is a versatile app that can be used for different purposes. But the default settings are not suited to live performances, music tuition, musical collaborations, nor leading dance, fitness & yoga classes. In these cases, users need a rich musical experience where they can hear every detail. By changing the audio settings to use the High-Fidelity Music Mode Zoom will send much higher quality audio that is suitable for music teachers and students, music professionals, and listeners to online concerts and church services.
You might also like…
- How to create a Rembrandt lighting portrait photography setup
- Is Zoom free to use for video conferencing calls?
- Is Zoom Better Than Skype for Video Conference Calls?
- How to Share a Recorded Zoom Meeting
- Where Does Zoom Save Recordings on my PC and Mobile Device?
- How to Convert a Zoom Recording to an mp4 Video File
Tosh Lubek runs an audio and video production business in the UK and has been using the Canon EOS R since it was released in the Autumn of 2018 and the Canon EOS R6 in 2020. He has used both cameras to shoot TV commercials broadcast on Sky TV, promotional business videos, videos of events and functions, and YouTube creator content. He has also won several international awards for his advertising and promotional work. You can meet him by visiting his “video booth” at HashTag Business Events across the country.
Recent Posts
Most people use sandbags the wrong way. Here’s how to hang them properly on a light stand for maximum stability and safety — plus what to fill them with.
You're Using the Canon RF 50mm f/1.8 WRONG! Here’s How to Fix It
If you’ve recently picked up the Canon RF 50mm f/1.8 STM—affectionately known as the Nifty Fifty—you might be confused by that strange switch on the side of the lens. It doesn’t say AF/MF...